Learn to grow milky oat tops at a fraction of the cost in this surprisingly simple guide to growing milky oats.
")
A Surprisingly Simple Guide to Growing Milky Oats
Milky oats are amazing, but growing them to beyond organic standards, harvesting them by hand, and processing them in ways that preserves as much of their nutrition as possible is time-consuming and energy-intensive—and that means they can be expensive to purchase. Don’t you wish you could just grow milky oat tops for yourself?
Well, if you read the title of this guide, then you’ve already spoiled the surprise, because that’s exactly what we’re going to show you how to do.
How to Grow Oats to the Milky Stage
")
Patrick Alexander from Las Cruces, NM, CC0, via Wikimedia Commons
In fact, we’re about to give you the “Too Long; Didn’t Read” version of this whole guide—right here; right now. You ready?
- Clear some ground.
- Plant your oats 1–2 inches deep.
- Keep them moist until they sprout.
- Sit back and relax. (Give them a little water if they start looking dry and sad.)
- Harvest the oats when they swell up and fill with white liquid.
Done. That’s it. You now know how to grow your own milky oats. If you don’t believe me, go ahead and read the rest of the guide. It’ll give you plenty of ideas for helping the process along. Just promise me you won’t get overwhelmed. These are just suggestions. You can take them or leave them.
What Makes Oats So Easy to Grow?
")
Image by เสาวภา ลื่นลม from Pixabay
Oats are very forgiving. They grow about as easily as you wish your other garden plants would. In fact, they’re as easy to grow as grass. That’s because they are grass, technically. Oats are in the Poceae (grass) family, along with wheat, rye, sorghum, millet, corn, bamboo, and most of your lawn.
What makes oats so easy to grow? They have a special ability called C4 photosynthesis. Most other plants are stuck with the old model—C3 photosynthesis. The difference of efficiency.
What if there was a drink that would give you “renewed zest and vigor,” spark a “glowy” feeling, and give you “a sense of buoyant wellness”? It’s not too good to be true—it’s the power of milky oats! Click here to take the 14-Day Milky Oats Challenge.
Plants, along with everything else on earth, use carbon to construct their bodies. Animals get carbon from the food they eat. But plants don’t have mouths. (Venus flytraps come close. Okay, so most plants don’t have mouths.) They get their carbon out of the air.
Here’s some science talk about what’s happening inside your plants. Feel free to skip this part if you’re not a plant nerd like me.
In the first stage of photosynthesis, C3 plants produce a compound with 3 carbon atoms. C4 plants produce a compound with 4 carbon atoms. This means that, for any given amount of sunlight, C4 plants are 33% more efficient! That’s a significant advantage over their competition.
You May Also Enjoy:
“Holistic Doctor Explains: Herbal Solutions for Stress”
“Calendula: Lymph Mover, Detoxifier, Cancer Fighter, and Skin Beautifier”
This efficiency means that your oats can often trudge along even in hot and dry conditions, and in depleted soils. Of course, they’ll be happier if you baby them a little. And your milky oats will be more potent when grown in nutrient-rich soils. That’s what we’re really after, right?
If all that wasn’t enough, I’ll share with you another perk. Oats are wind-pollinated. I love my bees and butterflies, but they aren’t always active when and where I want to grow things. Rather than planting additional rows of flowers to attract pollinators, you can just put all your oats together and let the wind take care of it. Simple!
Buying Oats for Seed
")
Forest & Kim Starr, CC BY 3.0 US, via Wikimedia Commons
Before we get started planting, you’ll need to get some oats. Most feed stores carry oats to be used by farmers as a cover crop.
If you’re in this to harvest oats in the milky stage, the species to get is Avena sativa. You can run that by the sales person to make sure you’re getting the right thing.
However, if you’re envisioning making oatmeal with your harvest, you’ll want to ask for hulless oats (Avena nuda).
Hulless oats aren’t truly without hulls. But they are much easy to get off and absolutely worth the investment if food is your goal (unless you own an industrial oat de-huller). Hulless oats sometimes go by the name Streaker or naked oats.
Planting and Growing Oats to the Milky Stage
")
How to grow milky oat tops, from planting to harvesting and beyond. Image by Michael Römer from Pixabay
Planting oats is a breeze. Start by preparing your soil as you would for any other plant. Loosen the soil with a tiller, digging fork, or shovel. Remove the weeds and other plants, and stir in any amendments.
Amendment #1: Nitrogen
While oats are very forgiving, the oats (and you) will be happier if you start with the best soil possible. It’s a good idea to have your soil tested to check for deficiencies.
You May Also Enjoy:
“Organic Nitrogen Fertilizer: 6 Secrets to Soil Health”
“Special Challenges to Managing N-P-K in the Organic Garden”
Compost is always welcome in your soil, and your oats will definitely appreciate it. But as a grass, oats enjoy a little extra nitrogen. Some good nitrogen sources are well-composted manures, diluted (pharmaceutical-free) urine, and fresh green plants.
If you dig out your garden bed, you can throw all those weeds in the hole and burry them. All the energy they stored up will become food for your oats. Don’t you just love nature?
Amendment #2: Magnesium
Magnesium is another element to consider adding. Magnesium is found naturally in the soil and is part of what gives milky oats their medicinal power. But magnesium can be depleted over time, especially when harvesting mineral-accumulating plants.
You May Also Enjoy:
“Homemade Fertilizers—15 Simple and Inexpensive Options”
“How to Improve Your Terrible Soil”
“Sheet Mulching: Build Soil, Thwart Weeds, and Make Your Garden Fertile”
You can add magnesium back to the soil with compost, chicken manure, and epsom salt. Oyster shell is another good option if you’re looking for a slower, more sustained, effect.
If you’re nervous about adding in too many amendments, try adding them to the top of the soil. They’ll get watered in a little at a time, making them much less likely to overwhelm your plants.
Soil and Sun Requirements
")
Image by Katharina N. from Pixabay
Pick a spot with full sun. We want to leverage that C4 photosynthesis for all it’s worth. You also want to pick an area with soil on the drier side. I don’t mean “desert” dry. You just want to avoid boggy-soggy soil. Avoiding excess salinity will also help.
The ideal pH for oats is between 4.5–7. But again, they’re a forgiving plant. Oats will grow and produce over a larger range, but with diminished returns.
Oats can be grown in beds or rows. But since they’re wind-pollinated, they do best when close to one another.
Planting and Germination
Plant oats in early to mid-spring, or in the fall. They germinate best when soil temperatures are around 59°–73°F (15°–23° C). Plant them about 1–2 inches (3–6 cm) deep and 7.5–12 inches (18–30 cm) apart.
Or just scatter them all around and stir them in with a rake. That’s what some people do.
You May Also Enjoy:
“Oatstraw Benefits: Stress Reliever, Love Potion, Brain Booster, and More”
Keep the ground moist to allow seeds to germinate, and continue to do so while the oats are small. This is the most vulnerable time for your little baby oats. Don’t let them completely dry out at this stage. Once they get established, they’ll be much hardier, and you can just come back to check in on them every now and again.
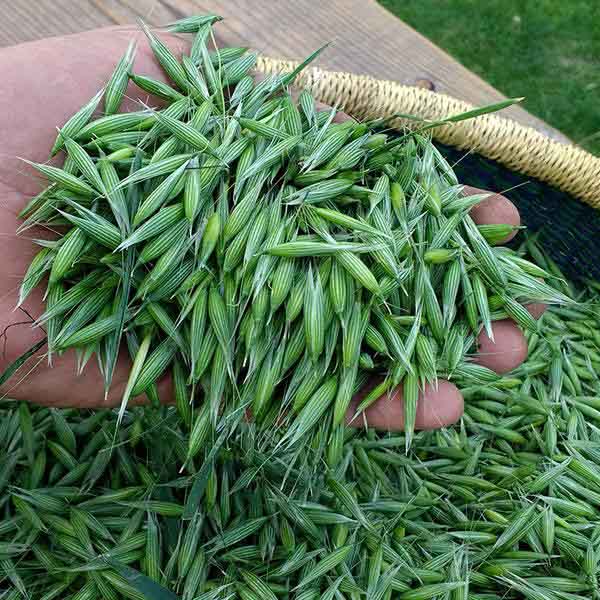
Harvesting and Processing Milky Oats
")
You may be thinking that the easy part is over, now that it’s time to pick all those individual oats. Well, think again. Harvesting milky oats is actually super easy and fast. But first, we have to know when to harvest.
Watch for the immature grains to form. They’ll begin to swell as they fill with fluid. Periodically give a few a test squeeze. You want to see a good amount of white fluid come out. This is the milky stage, and that white liquid is the good stuff. The more, the merrier.
How to Know When Oats Are Mature
Oats at the top will mature ahead of oats down the stalk. The ideal time to harvest is when the topmost oats are full and milky and the oats near the middle are partly milky. The bottom oats may not be milky at all. But if you wait on them, the top ones will pass over the milky stage and lose some of their medicinal power.
If you really want to maximize your harvest, you can harvest the top half of the stalk now, then come back in a week or two to harvest from the bottom of the stalk.
To harvest the oats, first put on a pair of light gloves. Oats aren’t especially hard or abrasive, but if you’ve got a lot to do, you’re likely to rub a blister.
You May Also Enjoy:
Grasp 2 or 3 stalks in each hand and pull up. You now have two handfuls of milky oats. Congratulations!
Repeat this until you’ve gone through almost the whole crop. However, be sure to leave some plants unharvested. Let them mature so you can replant your crop next year.
The oats you’ve harvested are ready for tincturing or drying and storage.
Harvesting Containers
Let’s talk about containers for a moment. A hands-free container is ideal. A cherry-picking bag or harvesting apron works well because you can carry it with you. You could even cut a couple of slots into a 5-gallon bucket and run your belt through it.
If you don’t have any of that handy, just have your kid (or a neighbor’s kid) carry a bucket for you. They’re young and they have strong backs. Just remember to say, “It builds character,” whenever they start complaining.
What to Do With the Leftover Oat Straw
")
Image by Tapani Hellman from Pixabay
Once you’ve harvested all those lovely milky oats, you’ve got to decide what you’re going to do with the oat straw that was left behind.
One option is to turn it under and let it feed the next crop you put in.
Another option is to harvest it and dry it for use in infusions. (This is a great time to harvest the straw. It’s still vibrant and full of energy. Plus, it’s much less vulnerable to fungal infections. You could leave the straw to dry in the field. Just be careful to avoid any patches with purple or black spots.)
You May Also Enjoy:
“10 Incredibly Powerful Antiviral Herbs”
If you choose to harvest it, we recommend cutting it up while it’s still in the ground. It’s like having an extra hand holding it steady as you cut—very convenient.
Grasp the top of the straw with one hand. Use a cutting tool (a handheld grass sickle works well) to cut it to the desired length. Work down the stalk like this until you’ve got it all.
Conclusion
And that’s it! You are now an oat-growing expert. Feel free to play Pomp and Circumstance (that’s the graduation song) and throw your hat in the air.
If you’re hungry for more info on milky oats and oat straw, check out the full herb profile here. Or head on over to the TGN Forums to get into the conversation. We’ll see you there!
What Do You Think?
Have you grown oats to the milky stage? Have you used milky oats medicinally? Let us know about your experiences with milky oat tops in the comments below!
_________________________
Psst! Our Lawyer Wants You to Read This Big, Bad Medical Disclaimer –> The contents of this article, made available via The Grow Network (TGN), are for informational purposes only and do not constitute medical advice; the content is not intended to be a substitute for professional medical advice, diagnosis, or treatment. Always seek the advice of a qualified health care provider with any questions you may have regarding a medical condition. If you think you may be suffering from any medical condition, you should seek immediate medical attention. You should never delay seeking medical advice, disregard medical advice, or discontinue medical treatment because of information provided by TGN. Reliance on any information provided by this article is solely at your own risk. And, of course, never eat a wild plant without first checking with a local expert.
The Grow Network is a participant in the Amazon Services LLC Associates Program, an affiliate program designed to provide a means for our team to earn fees for recommending our favorite products! We may earn a small commission, at no additional cost to you, should you purchase an item after clicking one of our links. Thanks for supporting TGN!
The Grow Network is a global network of people who produce their own food and medicine. We’re the coolest bunch of backyard researchers on Earth! We’re constantly sharing, discovering, and working together to test new paths for sustainable living—while reconnecting with the “old ways” that are slipping away in our modern world. We value soil, water, sunlight, simplicity, sustainability, usefulness, and freedom. We strive to produce, prepare, and preserve our own food and medicine, and we hope you do, too!


COMMENTS(1)
I just got my seed in last week and can’t wait to get started! Thanks for this timely article!