It’s easy to make hard apple cider at home in 5 simple steps, using basic fermentation supplies. Plus, learn to make ACV with the leftovers.
")
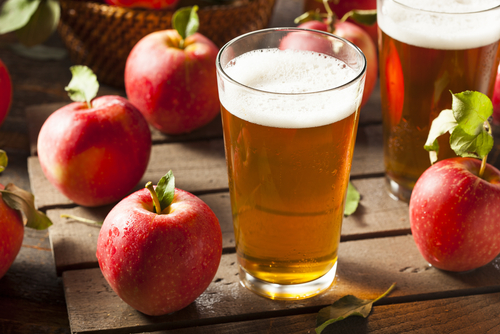
How to Make Hard Apple Cider in 5 Easy Steps
In my region of rural North Carolina, just about everyone “puts up” apples each year. Whether they grow their own or get them by the bushel (about 42 pounds worth) from orchards, apples are a mainstay of our food culture.
Many of us know the old adage that “an apple a day keeps the doctor away,” or its precursor, “to eat an apple on going to bed, keeps the doctor from earning his bread.” This probably had some influence on the generally accepted utility of apples in a healthy diet.
The Advent of Cider Apples
")
Historically, though, apples weren’t grown for their health benefits but for their high sugar content. Our ancient ancestors started cultivating crab apples thousands of years ago. Cider apples—a sweeter, more juicy version of the wild crab apple—were their first successes.
Now when I say “cider,” I mean the hard kind. Our ancestors understood the value of alcohol both economically and from a preservation perspective.
You May Also Enjoy:
“DIY Fire Cider Recipe—Simple & Powerful”
“How to Peel 20 Cloves of Garlic in 8 Seconds”
Let us do the prep work for you! Check out our DIY Fire Cider Kits in the TGN Store!
Without regulated refrigeration, it was impossible to store these early apple varieties for long. So fresh eating and extracting the juice to make alcohol became the norm.
Once upon a time, every farmhouse in England and most of the U.S. made hard apple cider annually. It wasn’t until the last 50 to 100 years that factories began usurping the role of cider-making.
Early Juice Extraction Methods

On early farms, it took some work to press the juice for cider. Yet, on the whole, putting up apples ranked on the easy side of self-sufficiency for our not-so-modern homesteading ancestors.
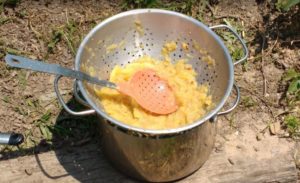
Making the juice is essentially a 2-step process. First, you have to crush the apples. Then, you have to press the juice out of the crushed apples.
Early apple pressing basically looked like a large mortar and pestle. Wooden bats would have been used to mash the apples over a hard, curved surface.
You May Also Enjoy:
“How to Make Fire Cider Vinegar [VIDEO]”
“How to Make Your Own Tinctures, Salves, and Essential Oils”
“Zone-Pushing Tips for Growing Ginger and Turmeric in Cold Climates”
After initial crushing, even harder pressing would be done using weights like rocks. Also, crushed apples were sometimes layered in straw, over a collection trough, to create a natural sieve. Then, gravity and time would draw the juice from the apples.
In large operations, a stone mill might have been used to crush the apples and extract the juice. When gears gained in popularity, people started using hand crank apple mills at home. Then, the juice was put into cloth bags, inside a slatted basket, and pressed using a solid lid with a crank.
If you want to make your own cider apple press at home, check out this PDF guide from The New Cider Maker’s Handbook author Claude Jolicoeur.
Making Hard Apple Cider
")
Once the juice was extracted, making the cider was easy. The fresh cider was put in open containers in a cool, dark location (e.g., a root cellar) and allowed to sit for months.
A kind of crust, from the floating apple particles, would form on the top of the open container. This crust created the nearly anaerobic conditions necessary for good fermentation.
Once the crust formed, natural yeasts converted the sugars to alcohol slowly over time. Storing the cider in a cool location (50-55°F or 10-13°C) was necessary to prevent the cider from accidentally turning to vinegar during the fermentation process.
After roughly 4 months of slow fermentation, the cider was ready to consume.
Modern Commercial Cider-making
Our modern cider-making methods aren’t that different from yesteryear’s. We now use engines to operate our grinders and more sophisticated presses to extract every drop of liquid.
We also use airtight, stainless steel vats or glass carboys with airlocks for optimal fermentation. Better temperature control and cultured yeast also ensure complete fermentation. Sugar content in juice is measured and adjusted to ensure the desired volume of alcohol results.
Otherwise, though, the process is much the same. Make juice. Make alcohol. Drink responsibly!
Farmhouse Meets Modern Cider
Today, you can easily make your own hard apple cider at home, using a mix of farmhouse and commercial methods.
Step #1: Start With Fresh Cider
Press your own fresh cider. Or, head to your local orchard to buy a few gallons of fresh, unpasteurized* cider for not much more than the price of organic milk.
Ideally, cider should come from apples that are considered “cider-type,” such as Arkansas Black, Cortland, or Cox Orange Pippen. However, as long as it comes from fall apples (not summer apples), it should have a high enough sugar content to make good cider. Mixing different kinds of apples can improve the character of your cider, too.
(*Pasteurization kills potentially toxic bacteria that can kill you. I am a raw cider, milk, etc., kind of person. But, your personal safety decisions are just that—personal. So heat your juice to 165-185°F or 74-85°C if you are concerned about E. coli and other bad stuff in your cider.)
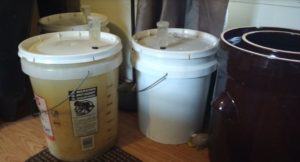
Step #2: Put Cider in a Fermentation Vessel
Fermentation is much easier when you use proper fermentation equipment. Glass jugs (carboys) or 6.5-gallon fermentation buckets with tight-fitting airlocks work best. Or, you can retrofit any lidded, airtight container with a rubber or cork stopper and an airlock.
Step #3: Add Yeast
Champagne, brewers, or cider yeast are recommended for making cider. However, we were occasionally getting off tastes in our cider, so a friend recommended we use distiller’s yeast. The fermentation happened faster, and our cider was extra dry the way we like it. So, that’s my preference.
Since yeast comes in many forms, follow the usage guidelines provided by the manufacturer. Also, make sure the yeast is properly stored and watch the Use By date.
You May Also Enjoy:
“Soothe a Sore Throat With Herbal Ice Cream”
Preferably, add yeast within 24 hours after pressing. If you wait a few days after pressing, natural yeasts will have a head start over your cultivated yeasts.
You can also use natural yeasts to make cider. Generally, natural yeasts will make less alcohol than cultured yeasts. Plus, natural yeasts may not be present at sufficient rates to get quick fermentation. Slower fermentation can lead to off flavors or cultures.
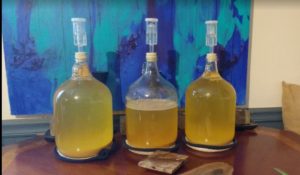
Step #4: Airlock It and Forget It (For a While)
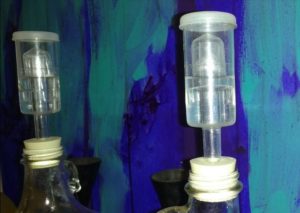
Ideally, when using cultured yeasts, you’ll ferment your cider at about 65°F or 18°C. This is where I keep my house thermostat in cool weather, so our fermentation happens on our dining table. Anywhere between 55-75°F or 13-24°C will work, though.
To ferment, just put your airlock in place and leave your cider alone for about 4 weeks. Within 24 hours, you should start to see air bubble action coming from your airlock. This is a sign that your yeast is working.
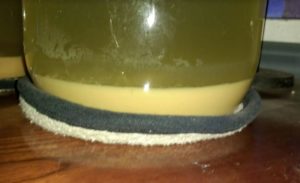
Activity will be most vigorous the first few days. However, it will continue for several weeks. As fermentation occurs, sediment will settle at the bottom of your bottle and your cider will become more clear.
Step #5: Bottle Your Cider
Your cider is usually ready for bottling after about 4 weeks in the carboy or bucket. You can transfer your cider to another carboy using a siphon so that any sediment is left behind. Then you can let it clarify (i.e., sit around for a few more weeks before bottling). Or, you can just bottle it (my preference).
You May Also Enjoy:
“Oatstraw Benefits: Stress Reliever, Love Potion, Brain Booster, and More”
Flip-top beer bottles or twist-top wine bottles work great for cider. Bottles should be sterile, which you can achieve by washing them with soap and water and then sanitizing them. A tablespoon of bleach in a gallon of water makes a great sanitizer.
Siphon Method
For bottling, use a siphon to draw the cider from the carboy into your bottles. Stop siphoning before you get to the sediment at the bottom of the bottle.
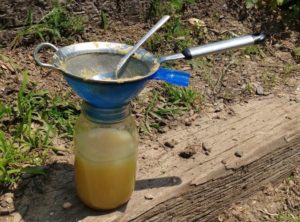
Colander Method
If you don’t have a siphon, filter out sediment by straining your cider into a pot or bucket using a colander lined with a clean flour-sack towel. Then, pour your filtered cider into bottles using a funnel or a spouted pitcher.
I like a little sediment in my cider—it makes it feel earthy and taste homemade. So, I am not a stickler about sediment removal. But some people prefer more precise sediment removal. Adjust your methods for your tastes.
Option #1: Add Fizz
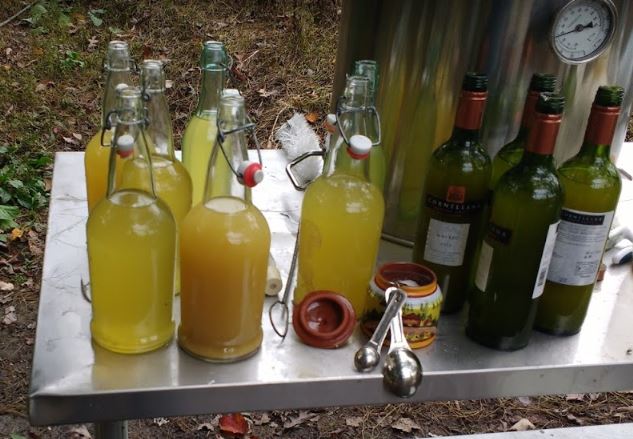
If you want to add fizz to your cider, bottle it when it is close to dry (not sweet), but still has a slightly sweet taste. By bottling before fermentation is done, the yeast will keep working on the sugar and create carbon dioxide as a by-product. That carbon dioxide, trapped in your airtight flip-top bottle, makes the carbonation.
Or, if your cider is dry-tasting when you bottle it, add a 1/2 teaspoon of sugar to your bottle, close, and shake. Some people also use simple syrup, brown sugar, or agave to carbonate. But, plain old white sugar eventually does the same thing, too.
Too much carbonation can lead to bottle explosions, so I store my fizz-filled bottles inside a closed box just in case they explode. That way glass doesn’t get all over the place.
You May Also Enjoy:
I also keep an eye on the neck of my bottles. I only want a few bubbles showing in the collar. If I notice a sea of white fizz, I put on my safety goggles and bomb suit and pop that top in a secure location (i.e., no pets or people around).
Fizz is risky! Use caution and remember you are an independent, thinking human being making your own personal choices. And you are doing this at your own risk! (In other words, don’t blame me if you overcarbonate your cider and your bottle blows up on you!)
Option #2: Add Sweetness
Yeast eats sugar and excretes alcohol. Sorry, I know that’s not a pretty picture, but it’s about as clear as I can make it. You can slow the yeast down with refrigeration, but that won’t stop them from eating and excreting.
So if you want sweet cider, you’ll have to fake it. Some people use xylitol or stevia to add sweetness to their cider. Others use alcohol sugar or apple cider flavoring. Any sweetener that doesn’t contain sugar will work.
Apply sweet flavorings to your liking. This is your personal cider after all!
Bonus: Make ACV With ‘Cheese’
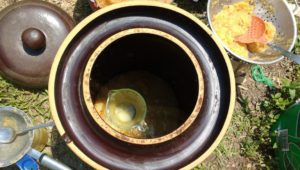
Now, if you are going to go to all the trouble of pressing apples to make cider (or getting someone else to do it for you), you may also want to consider making apple cider vinegar (ACV) at home.
To make ACV, all you need to do is take that crushed apple mess left behind after pressing (called “cheese”), put it in a food-grade bucket or crock, and cover the cheese with water.
Cover the bucket with a thin towel so it can breath. Put it in a slightly warm (about 75°F or 24°C), dark location and let it sit around for 6 months.
After that, press out the liquid the same way you pressed your apples initially, and bottle your homemade ACV!
Really, it’s that easy! That leftover vinegar mash can then be applied liberally on pesky weeds to kill them dead.
What Do You Think?
Have you made hard apple cider or apple cider vinegar? Do you have any tips and tricks to share? Use the comments section below to share your experience and questions with our Community!
______________________
The Grow Network is a participant in the Amazon Services LLC Associates Program, an affiliate program designed to provide a means for our team to earn fees for recommending our favorite products! We may earn a small commission, at no additional cost to you, should you purchase an item after clicking one of our links. Thanks for supporting TGN!
The Grow Network is a global network of people who produce their own food and medicine. We’re the coolest bunch of backyard researchers on Earth! We’re constantly sharing, discovering, and working together to test new paths for sustainable living—while reconnecting with the “old ways” that are slipping away in our modern world. We value soil, water, sunlight, simplicity, sustainability, usefulness, and freedom. We strive to produce, prepare, and preserve our own food and medicine, and we hope you do, too!


COMMENTS(2)
I accidentally made some wine from improperly stored grape juice back in collage. But from that accident, I took up wine making. My mom also became interested in wine making. And since we had an apple tree that produced well, she started making apple cider. She has been gone for many years, and I haven’t made any apple cider for a long time, but my apple trees are producing well, so I need to find someone who has a press and is willing to share so that I can start making cider again.
Can you juice the apples instead of pressing?