Making medicines is easier and safer when you use a good labeling system from start to finish. Here’s how to label homemade herbal medicines.
")
How to Label Homemade Herbal Medicines and Why You Should
I’ve been growing most of my own culinary, tea, and medicinal herbs for several years now. But I remember the first year my herb garden really became productive. I could barely keep up with the harvest. So, I just started throwing things in paper bags and mason jars until I could figure out what to do with them.
I somehow imagined that I’d remember, or be able to tell, what everything was weeks later. Boy, was that a big mistake! I ended up throwing out half my harvest simply because I couldn’t figure out what it was.
You May Also Enjoy:
“19 Benefits of Hibiscus: Blood Pressure Regulator, Cancer Fighter, Liver Protector, and Much More!”
“12 Uses for Rose Petals — From the Kitchen to the Boudoir (With Recipes)”
After that, I learned the importance of using good labeling systems—from harvesting to final products—when working with herbs for medicinal and culinary purposes. Just in case you also have my hubris and think you can magically remember all this stuff, let me give you a few reasons why you should consider using labels for your herb processing.
Reason #1: Most People Can’t Tell By Smell

Image by Nat Aggiato from Pixabay
When dried, some herbs mellow and others intensify. Rosemary, sage, thyme, tulsi (holy basil), and lavender all become even more pungent and powerful when dried. However, the savory, lemony goodness that comes across loud and clear in fresh parsley, lovage, or lemon balm nearly disappear within a few days of picking, making them hard to identify when dry.
You May Also Enjoy:
Oh, and the licorice-like aroma in hyssop mint and sweet mace will linger for months when dried. However, the similar fragrances found in fennel leaves and French tarragon diminish much more quickly. Fresh horehound, another licorice-like herb, smells like dirt. Yet only when dried does it hint at its distinctive aroma, which we all associate with old-time cough drops.
The most licorice-scented source of all, licorice root, has been found to have more than 50 volatile compounds that contribute to its aroma. Unfortunately, not all of those compounds are equally expressed in all harvested root. In some cases, those compounds may cause your sniffer to misidentify licorice root as being pine, eucalyptus, anise, popcorn, deep-fried food, or a variety of other items that are distinctly not licorice-like!1)https://www.chemistryworld.com/news/secret-of-liquorices-unique-smell-unravelled/2500020.article
You May Also Enjoy:
To put it plainly, unless you have spent enormous amounts of time studying the possible aroma complexes of dried herbs, most of us simply can’t rely on our sense of smell to discern dried herb identity. Too many factors from time of harvest, soil quality, storage methods, and more impact the olfactory output of dried herbs.
Reason #2: Dried Herbs Are Hard to ID

Drying is not just a tool for preservation, but an act of total transformation for some herbs. Fresh stinging nettle, for example, is practically unusable because it causes itching and stinging if any part of the plant comes in contact with your body. Once dried, though, the caustic compounds are rendered ineffective and the plant becomes a medicinal go-to for overall good health.
Now, while it’s extremely easy to identify fresh stinging nettle (Urtica dioica) if you fall into a patch of it outdoors, once dried, its broken leaves resemble lots of other herbs. For example, I doubt many people would be able to accurately distinguish dried stinging nettle leaves from the dried leaves of its much less caustic cousins wood nettle (Laportea canadensis) and purple dead nettle (Lamium purpureum).
You May Also Enjoy:
“19 Remarkable Benefits of Stinging Nettle”
“15 Natural Aphrodisiacs & Simple Ways to Prepare Them”
“Edible Redbud Flowers—The Delicious and Nutritious Harbinger of Spring”
All 3 of these plants have medicinal benefits, but they cannot be used interchangeably. If you, like me, harvest all three of these herbs for different uses, then it is super important to label at the time of harvest rather than later when you don’t have details like habitat, growth habits, flowering periods, seeding and propagation methods, and more to help with plant ID.
Reason #3: Safety
")
So far I’ve focused on herbs that are safe to eat even if you can’t perfectly identify them when dried. However, as you get deeper into making your own medicines, you might start to experiment with herbs that require exact dosing if used internally or that are only meant for topical application.
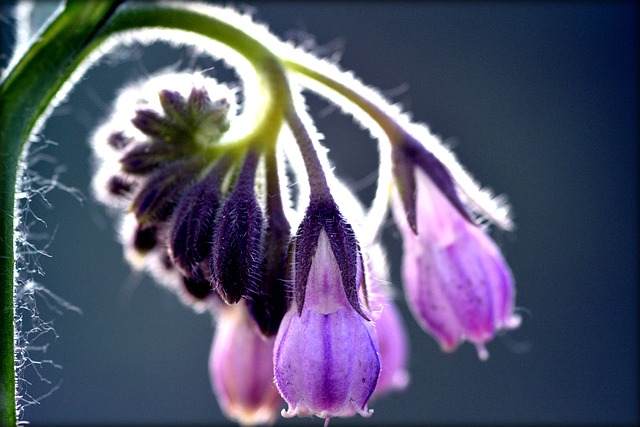
Comfrey, for example, is used internally in certain situations, though usually only under the guidance of an expert herbal medicine practitioner. However, it is used topically for all sorts of skin and bone injuries.
You May Also Enjoy:
“How to Make Your Own Tinctures, Salves, and Essential Oils”
“Equisetum Hyemale (Horsetail): The BEST Plant for Tooth Health + 8 More Benefits!”
Comfrey’s cousin borage, a common companion plant in the garden, is considered safer to ingest due to lower quantities of liver disease-causing alkaloids. In fact, borage is sometimes even taken as a tea.
When dried, it is virtually impossible to tell comfrey and borage leaves apart. So, without good labeling systems, you might end up confusing a mostly safe edible with a topical-use-only herb that’s potentially dangerous if ingested!
Reason #4: Time Savings
The fact that you can’t identify all dried herbs by smell or sight, and may run into safety risks from trying to, is probably reason enough to have a good labeling system. But, the truth is, it’s just faster to label things in the first place than to try to figure it out later.
You can write a label in a few seconds. Or, you can spend 5 minutes trying to sniff and recall what something is and when you harvested it.
The time-saving benefits of labeling become especially important when you start mixing, matching, and experimenting with different menstruums (extraction liquids) and methods. For example, what if you come up with a perfect tincture or herbal infusion blend to treat your seasonal allergies or occasional insomnia?
You May Also Enjoy:
Perhaps you tried multiple recipes and ultimately ended up using a mix of 2 recipes with some slight variations you figured out yourself. You want to make it again. But, you made the blend 6 months ago and now can’t remember exactly what you did.
You could just repeat the weeks to months of experimentation over again and hopefully rediscover the same winning formula. Or, wouldn’t it be nice if you had your recipe right on your label and could just refill your bottle?
4 Ways to Label Homemade Herbal Medicines
OK, so by now you’re convinced. Right? You are going to become a label guru and save yourself time and frustration.
Great! Now, I have just a few more tips to help make it easy for you to keep track of all your herbs from harvest to final preparation. Personally, I use 4 different ways to label my herbs depending on where they are in process.
If you grow or harvest your own herbs, you’ll want to read about all 4 label types. However, If you plan to buy your ingredients elsewhere and then make your own products, you can skip down to labels 3 and 4.
Label #1: Harvest Labels
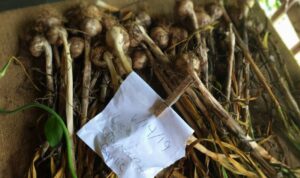
When I harvest, I write the name of what I harvested and the date I harvested it on a scrap of paper. This is basically just for identification of the plant and for calculating “use by” dates for later preparations.
Since I use a whole bunch of different drying and processing methods, I clip this temporary label to wherever makes sense, using a clothespin. In the case of my garlic above, I just clipped it in the middle of that bunch. If I have something in the dehydrator, I clip the label to the lid until I take the dried herbs out.
You May Also Enjoy:
“Siberian Ginseng: The Adaptogen for Astronauts, Athletes, and Anyone Under Stress”
This is not a terribly sophisticated method. But after drying, those harvests will usually get processed again and put in some other container for longer keeping. So it doesn’t make sense to spend more than 10 seconds on labeling at this point.
On my homestead, no one bothers my herbs in process until I have them ready to use in easy-to-access containers. But, if people like to move your mid-process herbs around, you might want to add things like “Drying, Don’t Disturb” just so they don’t put your harvest in the compost bin.
If you wild-harvest your herbs, you may also want to include details on where you sourced them so you can transfer it to other labels later.
Label #2: Single-Ingredient Labels
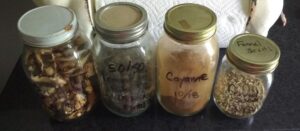
Once my harvest is dried, I usually transfer each herb to a container suitable for longer-term storage. Most of my herbs end up in mason jars, in other repurposed glass containers, or in tinted freezer bags.
For glass jars, I just write directly on the glass using a marker. This label can be easily scrubbed off later so I can reuse those containers in the future. For plastic bags, I put a scrap slip of paper inside the bag, face up, so I can read it. Then, if I want to reuse the bags, I can.
For these single-ingredient labels, I include the name of the herb and the date harvested as I do for my harvest labels. At this point, I also add any cautionary information needed, such as expiration dates. For example, the borage I mentioned earlier is best used within 1 year. So, I’d include a “use by” date that is 1 year from the harvest date.
You May Also Enjoy:
“Calendula: Lymph Mover, Detoxifier, Cancer Fighter, and Skin Beautifier”
“The Grapes of Youth: 11+ Age-Defying Reasons to Love This Plant”
“Making and Using a Poultice … Even on Hard-to-Treat Areas!”
Also, I don’t live alone, which means other members of my family might also access my packaged herbs. So, for things that are only good for topical use, I’ll clearly mark their intended use. I’ll add descriptions like “POULTICE USE ONLY” or “SALVE USE ONLY” on the label.
If you live with kids, you may want to be even more clear and mark things as “Poisonous.” Also, it may be best to secure non-edible herbs out of reach, or in locked cabinets, for additional safety.
If you wild-harvested your herbs, carry over those harvest details from your harvest label to this label so you know where to go back to when your supply runs low.
Label #3: Medicine in the Making Labels
Different herbs require different extraction and preparation procedures. For example, when making a cough syrup, you might have to make both an elderberry syrup and a tincture of horehound and echinacea to make your product. Since tinctures can take weeks and syrup can be made seasonally and stored until needed, you may want to make interim labels to identify each product until you combine them as cough syrup.
You May Also Enjoy:
“Elderberry: Natural Remedy for Colds, the Flu, Inflammation … Even Cancer!”
For the syrup, you may want to record the amount of sugar used and how much of a reduction it was. For the tincture, you may want to include details of when you started the tincture or strained it, in addition to the plant names and date-of-harvest details from the ingredient labels used.
Again, since these kinds of preparations are often stored in glass containers, you can use a marker and write on the jar. Or, if you are using pottery or other containers, then an approach like the harvest label using a scrap of paper and a clothespin will work. Or, maybe you’ll want to use a strip of masking tape for your label.
The key things to record here are the ingredients and quantities, and any relevant date or cautionary information carried over from the single-ingredient labels. That way, you’ll be able to carry over this information to your final label when you assemble your multipart preparations.
You likely want to include details on your menstruum, such as whether you used 50% alcohol or 90% alcohol. You may also want to detail how many grams or ounces of the dried herbs you used in the tincture.
Label #4: Final Product Label
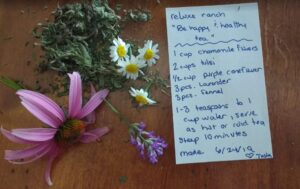
The last label type you’ll need is the “product label.” This is basically the fancy label you’ll put on your final product such as your elixir, cough syrup, tea blend, vinegar infusion, salve, or whatever other kind of custom product you create. If these products are just for your use, you might still use a marker or slip of paper as your label. However, if you plan to share these with others, you may want to upgrade to more polished-looking labels.
I personally hate dealing with glue, and I reuse all my jars. So my favorite way to make a final preparation label is to write my information out on card stock and cover it with clear packing tape or tuck it in a resealable plastic bag to make it durable. Then I use a hole punch and some twine to attach it to my container.
Many people will also print a professional-quality self-adhesive label or use clear packing tape to adhere a handwritten label to a jar. The appearance and application method used are entirely up to you. However, here are some things you might want to include on the label:
Product Name
If you’ve gone to the trouble of making a multipart product, then you might want to give your creation a creative name. This is totally optional, but it makes it easy for people to thank you for your gift by name instead of saying that “stuff” you gave me.
Place Made or Person Making It
Again, this is optional. But if you are sharing your creations with others, recipients appreciate these kind of personal details. It makes it easier to brag to their friend about you, too!
You May Also Enjoy:
“7 Ways to Use Pine Trees for Food and Medicine, Year-round”
Ingredients
This is really important if you are sharing with others who might have allergies or intolerances to any of the ingredients you used. For your own purposes, if you experiment a lot, you may want to record exact quantities used and preparation details on your label so that you can duplicate the process when the container starts to run low.
Note: If you don’t carry your recipes over onto your final product labels, make sure you record them in your home medicine journal so you can make them again as needed.
Warnings
As we already covered with single-ingredient labels, including things like “topical use only” or expiration dates are important on all stages of labeling after harvest.
Dosage and Usage Recommendations
Different medicine mixes are used in different doses for different reasons. For example, you may use an immune-boosting tonic in small quantities daily or you may use it in higher quantities when your body is actually under attack or at risk for illness. Including any special details on how or how much to use is a good idea, particularly if you share your products with others.
You May Also Enjoy:
“How to Use Vitamin D to Help Fight the Flu”
Catchphrases
If you are still learning about herbal medicine, like I am, you may not always immediately remember the benefits of certain ingredients without looking them up. Including shorthand descriptions on usefulness of a preparation can save time.
Phrases like “memory boosting,” “stress management,” “immune-boosting,” “mood-improving,” “energizing,” “allergy support,” and more all work as good reminders of the utility of particular preparations.
‘Do Not Use’ Info
Some herbs are not for use when pregnant or while taking certain other medications. Including that information on your label might be really important if you share your medicines with others or periodically use the items that do not interact well.
Date Made
Even if your product doesn’t have a defined expiration date, including the date the product was made can help you prioritize when to use it. That way, you’ll clear your older inventory first or dispose of things that have been sitting around too long.
Good Labels = Most Benefit, Least Risk
Home herbalism isn’t something we master overnight. It takes time and effort to gain mastery and understanding of herbs and how to use them. Good labeling systems can help with you stay organized, learn faster, cut down on time wasted, and make sure you get the most benefit from your homemade medicines with less risk.
At first read, this may seem like a lot of work. But I promise, once you put a good labeling system into practice from harvest to final products, you’ll realize it’s so much easier than trying to sort this stuff out later.
What Do You Think?
Do you have labeling systems that work well for you? Have you ever blown it by not labeling? We’d love to have you share your experience with our Community in the comments below!
_________________
The Grow Network is a participant in the Amazon Services LLC Associates Program, an affiliate program designed to provide a means for our team to earn fees for recommending our favorite products! We may earn a small commission, at no additional cost to you, should you purchase an item after clicking one of our links. Thanks for supporting TGN!

Tasha Greer is a regular contributor to The Grow Network and has cowritten several e-books with Marjory Wildcraft. The author of “Grow Your Own Spices” (December 2020), she also blogs for MorningChores.com and Mother Earth News. For more tips on homesteading and herb and spice gardening, follow Tasha at Simplestead.com.


