It’s a lot easier to have soil problems than soil perfection. But whether you’re dealing with pH complications, drainage issues, rocky or cold soil, or perennial pest and disease concerns, Joel Karsten has a solution for you . . . straw bale gardening!
As the culminating event of TGN’s Spring 2017 Home Grown Food Summit, Marjory interviewed Joel about the innovative straw bale gardening method he created more than 20 years ago.
If you have soil concerns, this method is worth considering. (Be aware, however, that there are some hidden dangers to keep in mind.)
The following article provides a summary of highlights from Marjory and Joel’s conversation.
And If You Missed the Podcast, Click Here to Listen Now!
Straw Bale Gardening—What Is It and How Does It Work?
First, let’s talk about what straw bale gardening isn’t. You aren’t growing vegetables in straw. What you’re actually doing is growing them in very recently decomposed straw.
And it doesn’t have to be straw. It can be any tightly compressed organic matter. Use whatever you have available in your area: oat straw, wheat straw, barley straw, rice straw, hay, grass clippings, etc.
Depending on how large and tightly compacted your bales are, you may be able to get a couple of growing seasons out of them.
But even when the bale has lost its shape and decomposed extensively, you can still take that same straw, put it in a large container, and compress it. If needed, add additional organic matter such as fresh grass clippings and leaves, and just make a new “bale” yourself.
The Soil-Making Process
Essentially, you are creating virgin soil within the interior of the bale—soil that is free from lingering disease or insect problems, and which provides the nutrient capacity the roots need to grow. To create this decomposition, you encourage the rapid reproduction of naturally occurring bacteria by “feeding” them nitrogen.
Now, depending on which kind of straw you’re using, you could be starting with as much as an 80:1 ratio of carbon to nitrogen. What you’re aiming for at the end of the conditioning process is a 20:1 ratio. So, you’ll need to add a significant amount of nitrogen. (This process is called “conditioning” the bale.)
You’ll spend several days conditioning the bale, although exactly how long it takes depends on what type of nitrogen you choose—traditional or organic.
Either way, you’ll want to start the conditioning process 20 days before your area’s average last frost date.
This will help ensure that the temperature outside isn’t so cold that it inhibits bacterial growth. (If, however, you get a cold snap during this time and the daytime temperature stays below 45°F one day, just pretend that day didn’t exist. Don’t treat your bales at all that day—no fertilizer, no water. Simply start the conditioning process up again the next day.)
Conditioning With Traditional Fertilizer
If you condition your bales using traditional fertilizer, such as lawn fertilizer, the process will take 12 days from start to finish. Choose a lawn fertilizer that has at least 20 percent nitrogen. (Nitrogen will be the first of the three numbers on the bag.) Make sure it’s not slow-release nitrogen.
Use 1/2 cup on days 1, 3, and 5 of this process. Simply spread it on top of the bale. (You’ll add water afterward, which will help push the fertilizer into the interior of the bale. More on this in a minute.)
Then, use 1/4 cup on days 7, 8, and 9. On the 10th day, add the phosphorous and potassium by applying one cup of 10/10/10 garden fertilizer to each bale.
By day 12, you’ll be ready to plant.
Conditioning With Organic Fertilizer
You’ll need 18 days to complete the conditioning process if you use organic fertilizers such as feather meal or bone meal, both of which have about 12 percent nitrogen. These fertilizers work because they are high in protein, and as it decomposes, protein becomes nitrogen.
(Some people even use urine, which has between 9 and 12 percent nitrogen, but keep in mind that you’ll need about 3-1/2 gallons of urine per bale per day!)
If you use an organic fertilizer, use 3 cups per bale on days 1, 3, and 5. Then, use 1 to 1-1/2 cups on days 7, 8, and 9.
On the 10th day, it’s time to add phosphorous and potassium. Do so by applying 1 cup of bone meal and 1 cup of wood ash to each bale.
You’ll be ready to plant in the bale by day 18.
Irrigating Your Bales
Whether you use organic or traditional fertilizers, you’ll need to water your bales every day—during both the conditioning process and the growing season.
Every day during the conditioning process, add one gallon of water to each bale. If you’re watering on a day when you also fertilize, add the fertilizer first, then top it with water to help push it into the bale.
It’s okay if the fertilizer doesn’t completely wash into the interior. The bacteria will actually come up to the surface of the bale to access the fertilizer when they need it.
Ideally, use water that has been warmed to air temperature so you’re not inhibiting the decomposers with frigid water straight from the spigot. Simply fill a bucket with water today, then use it tomorrow so the water has had a chance to warm up a bit.
Once the conditioning process is complete, you’ll still want to water your bales each day.
There are two options that Joel recommends:
- The cheapest, easiest, and quickest method is to use a soaker hose. However, the UV light from the sun breaks them down fairly quickly, and you’ll end up having to replace the hoses eventually.
- Once you know straw bale gardening is for you, he recommends upgrading to a drip system. It’s a little more expensive up front, but due to its adjustable nature, a drip irrigation system allows you to save money on water long-term since you are able to water each bale only as much as the plant needs. For example, your tomatoes are going to need more water than your potatoes. With a soaker hose, you have to water to your least common denominator—meaning your potatoes are going to get overwatered so that your tomatoes can get enough water. Drip irrigation solves that problem.
The Benefits of Straw Bale Gardening
This unique gardening method offers many benefits:
- The virgin soil within the bale has a very neutral pH, so depending on your water, your soil will be about a 6.8 to 7 on the pH scale. That’s an ideal range for most edibles.
- Straw bales both drain and hold moisture exceptionally well. You can’t flood a straw bale garden. No matter how much you water it, it will only hold three to five gallons. The rest of the water will run right out the bottom of the bale.
- Since you are creating virgin soil during the conditioning process, you don’t have to deal with perennial insect or disease problems.
What Grows in a Straw Bale Garden?
Most plants will thrive in a straw bale garden.
A few won’t.
Personally, Joel has had trouble growing onions and rosemary in his.
He also doesn’t recommend trying to grow sweet corn in straw bale gardens, because their height and big root structure make the process inefficient. (You’d only get about four good stalks of corn per bale!)
And perennials like asparagus and rhubarb aren’t ideal since the bale will break down before those plants really start to produce well.
How Many Plants Per Bale?
Space your plants in the bale as you would if you were planting them in the ground. You might even be able to space them a little bit tighter.
In a bale, though, what you’d usually plant in a row you’ll plant in a checkerboard pattern, instead.
You can also build a trellis above the bales to allow your larger or vining plants—such as green beans, tomatoes, sweet potato vines, cucumbers, and squash—to grow vertically instead of horizontally.
It’s a very productive method, and you end up with a lot less disease and a lot fewer insect problems.
Any Special Instructions for Planting Seeds?
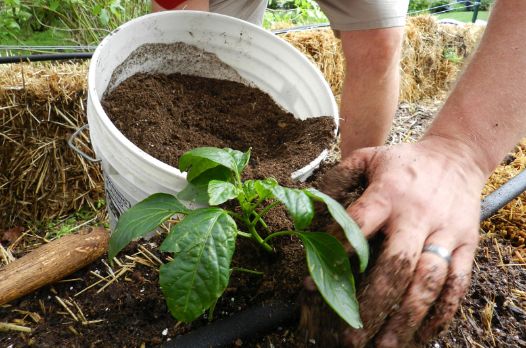
If you’re going to plant tiny seeds, you’ll need to make a seed bed on top of the bale with some really clean compost or potting mix. Spread it into a half-inch layer and put your seeds in that. They’ll root right down into the bale.
If the seeds you’re using are big, such as peas and beans, you can use your finger to push them right into the bale.
What If My Bale Is Full of Mature Seeds When I Get It?
While you are conditioning a bale, its interior will reach approximately 140°F or 150°F. This heat is going to kill most of the seeds that may be present at first.
But it won’t reach the outside of the bale, so it’s still possible to end up with a “chia pet” growing out in your garden.
If you do, simply head outside with a sponge mop and a cake pan filled with vinegar and a squirt of liquid dish soap. Dunk your sponge mop in the liquid, and wipe down the outside of the bale.
When those sprouts first emerge, they have very limited energy reserves. The vinegar solution will knock them back. And, since they won’t have enough energy in the seed to regrow, you’ll only need to use the vinegar solution on them once.
What if There Are Latent Herbicides in the Bale?
It’s true that many fields are sprayed with broad-leaf herbicides, and that it can take some of these chemicals a pretty long time to break down naturally. It’s one of the reasons we are often cautioned against using straw or hay as mulch in our gardens. After all, most of our edibles are broad-leaf plants, too.
Read More: “How to Rescue a Garden Destroyed by Grazon Contamination”
However, one of the great things about a straw bale garden is that it takes the guesswork out of whether or not your bales contain latent herbicide. The truth is that, if they do, your plants simply won’t grow.
If you’re concerned about it, though, Marjory recommends a simple test. (This test also works for manure.)
- Grow a flat of legumes.
- Mix the straw or hay with water in a five-gallon bucket and stir frequently for a day or two.
- Then, use the water on the legumes.
- Keep an eye on the legumes to see how they respond. If the second and third set of leaves look normal, the straw, hay, or manure is probably safe to use.
How Do I Keep Mice From Nesting in the Bales?
A properly conditioned straw bale really isn’t going to make an attractive home to rodents.
Since the straw itself has been harvested, it shouldn’t contain many oats or wheat seeds. That means it doesn’t provide much of a food source for rodents.
Also, during the conditioning process, the bale gets really hot inside and the interior starts to turn into a big, mushy pocket of soil. Neither of those conditions are attractive to mice or rats.
That said, there are a couple of things you can do to further discourage rodents from taking up residence in your straw bale garden:
- First, make sure there aren’t any bird feeders nearby. Those really tend to attract rodents.
- Second, make sure you’re watering your bale appropriately—on a daily basis, with the water fully saturating the bale.
It’s always important to do your research when embarking on a new gardening adventure. But once you do, you may find that straw bale gardening is the solution you’ve been looking for—no matter where you live, what your soil is like . . . or whether you have soil at all!
What Do You Think?
What are your experiences with straw bale gardening? Share your tips, successes, and cautions in the comments below!
(This is an updated version of an article that was originally published on July 5, 2017.)


COMMENTS(7)
Hi! I live in a hot spot for symphylans, the “little land sharks” that eat plant roots and destroy germinating seeds, gardens, flowers and the joy of summer. Do you know if straw bales will work on soil infested with these beasts? They love organic material, so I’m afraid I will be providing them with a smorgasbord of new vegetables with this system. Do you have an experience or know of someone who has successfully gardened this way with this problem. Thanks in advance!
Jeanie
They mostly like decomposing matter so the damage they do will most likely be to the bottom of the bales but should leave your crop and it’s roots alone. It only takes about two weeks to condition the bales why not try and experiment. The bales do shrink through the growing season which does not seem to harm the plants in them. I did have mice in my garden but had very little damage to the crops.
you can always do a raised bed straw bale garden, a shipping pallet will hold the bale high enough off the ground that they should not bother the bales, Or you could lay down a 3″-4″ layer of loose sand under the pallet or directly under the bale “they can’t tunnel in loose sand, so won’t migrate up from under ground”
A good sturdy picnic table style bench would also make a nice elevated base
I tore out an old fence, I left the posts on one of the east/west running sides.
I put two 2×6 between two fence posts “high enough my lawnmower can go under” and then made a platform that holds two bales end to end. ” Top bale and one side face sun, top of the bales 42 inches high, no more getting on your hands and knees and no weeding”
“I made two of these, with one more set of post I am going to utilize the same way after a little more clearing around them”
One with a trellis (aka Vertical Gardening) for my tomatoes, peppers and other climbers and also potatoes which I plant in the sides about 1/3 of the way up the side of the bale as well as Basil Chives and other herbs about 1/3 down the side from the top of the bales
The other set of bales has Strawberries, Cumbers, Squash and Finger Carrots with Potatoes and herbs in side of the bale as well.
Hope this gives you a couple ideas, good luck
I have used this method on my Wyoming desert soil, sand and rock and it worked well. It will works well on cement. I will say the initial fertilization is not enough I did the best using the Mittlieder method of weekly small feedings. I even had luck getting some perennial herbs started, I just left the bales where they were and the plant adapted as the bale shrank to nothing. I also was able to use most bales for a couple of years putting potatoes in the final year which makes harvesting easy. I only had one source for straw and did end up with some bales that killed my plants. From here on out I will buy either organic or get an alfalfa grass mix. At least I am finally in an area where I can talk to the farmer before buying. I will also say the experiments I did with grass hay did not have more weed sprouts than the straw and are easy to pull in both. When you condition the bale the interiors get up around 160 degrees so only seed on the outside of the bale will grow.
I will also add fantastic mulch / compost for my raised beds after the bales decomposed. I started a new garden last fall and will most likely go back to this method just to build organic matter on top of my clay.
You ought to be a part of a contest for one of the greatest blogs on the net.
I’m going to recommend this site!
That is a fantastic idea! It’s one they ought to do!
3 years after my attempt at straw bale gardening my entire garden area is still barren. I didn’t know about persistent herbicide and couldn’t figure out why I suddenly couldn’t grow anything. I also mulched everywhere with straw. I had to completely dig out my raised beds and start over. I am hoping that this year things will grow there but not even weeds are growing in the ground yet. Bad experience, never again will I use straw in my garden.