CAUTION: This article, and the photos in it, include graphic details about hog processing. If you are disturbed by information and images of this nature, please use your own discretion when determining whether to read further.
This is part 3 in a multipart series on slaughtering pigs on the homestead. In previous posts, I wrote about preparations for the slaughter and making the kill. You can read the previous entries here:
Read More: “Preparing for a Pig Slaughter”
Read More: “Pig Slaughter”
Now, we are moving on to hog processing. Here’s a quick overview of the basic steps that we’ll cover in this post:
- Step #1: Choose How You’ll Handle the Pig Hide
- Option #1: Remove the Hide
- Option #2: Remove the Hair
- Step #2: Remove the Head
- Step #3: Disconnect the Rectum
- Step #4: Risks in Evisceration (Gutting)
- Step #5: Remove Internal Organs
- Step #6: Chill the Carcass
Step #1: Choose How You’ll Handle the Pig Hide
Option #1: Remove the Hide
After you make the kill, you have a few choices about how to handle the pig hide. Some people prefer to skin a pig. This is probably the fastest, easiest method and requires fewer tools. However, if you want to use the pig skin for curing, in your bone stock, to make pork rinds, or to make leather, you’ll want to remove the hair first (see “Option 2: Remove the Hair” below for more details).
I have never removed a whole hide on a pig. I have skinned other animals, and it is easy as long as you are comfortable using a sharp knife. I prefer to remove the head and tail before skinning. Then, you need to cut a few openings through the skin, like seams, and use the tip of your knife to gently separate the skin from the muscles and fat.
I start skinning at the feet by opening a seam around the hooves and along the inside of the legs and working the skin free from the muscles with the knife. Next, I make a slit from the neck to the pelvis on the bellyside and work the skin away from the muscles until it is loose on both sides (like flaps). Your cuts should only be skin deep—don’t cut into the belly yet.
In male animals, you need to separate the penis and urethra from the skin. The penis area is visible, and you can find the urethra by feeling around with your fingers starting from the penis. The urethra feels like semi-hard tubing or straw. Cut around the penis and under the urethra until it is free from the skin.
Don’t disconnect the urethra from the rest of the urinary tract yet. You’ll remove it later when you eviscerate.
If the pig is hanging by the hind legs, work the skin over the hind quarters and down the back, then move on to the sides, and finish with the front shoulders. Using this method, gravity works for you and the hide comes off in one piece.
Option #2: Remove the Hair
There are a couple of different ways to remove hair. Both involve scraping the hair off the pig after heating the skin to loosen the hair follicles.
Straw Scalding to Remove the Hair
A few years back I wrote a blog series about our first pig slaughter. We had a lot of awesome reader comments and suggestions on hog processing. One of the ideas came from Anne. She said:
We raised and butchered many pigs growing up. Instead of the scalding to get hair off we burned straw to singe it off and then scraped. Laid the pig on a bed of straw first and did the burning and scraping in sections.
Glen also chimed in with his experience:
Instead of heating water to scald the hog, we buried it in straw and set that afire. You found that some areas weren’t sufficiently scalded to allow for easy scraping, and we had a similar situation. Whereas you spent “a lot of time, elbow grease, and [disposable razor blades],” we hit the stubborn areas with the flame from a propane torch to make them scrape-able with normal effort. Don’t overdo the flame, burning through the skin into the meat! Just fan the torch over the stubborn areas enough to make the scraping work with reasonable effort, similar to the properly scalded areas.
I haven’t tried this method yet. But, I wanted to share Anne’s and Glen’s experience since this also seems to be an effective and common way to remove hair.
Water Scalding to Remove Hair
Water scalding is our method for softening the hair follicles. We heat a tub of water to 155°F. We use a hoist to raise and lower the pig carcass into the water. For smaller pigs, you can use a 55 gallon drum. For pigs over 225 pounds, though, you probably need something larger.
We modified an old oil drum to make it work like a big bath tub. This took a lot of cutting and welding. But, the shape allows us to put multiple propane burners under the tub to heat the water faster. You can use any kind of vessel that holds water, fits your pig, and is safe to heat.
The key to a good scald is to get the water uniformly to about 155°F before you lower your pig into it. Use a paddle or a 2×4 to stir the tub and mix warm water over the burners with cool water near the surface. We also made an insulated lid to fit our tub so that our water heats faster and retains more heat between pigs.
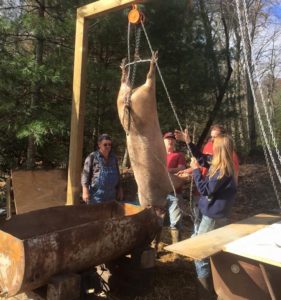
You need a way to lift your pigs into the water. Friends of ours use their front loader. We use a manual engine hoist rigged over a scaffold.
You need a way to attach your pig to your hoist. We make a slit between the hind ankle bone and the tendon. Then we push each side of a gambrel through the slits. We also use a gambrel on the front hooves as a directional to help lift and lower our pig safely into the water.
We lay chains over both sides of our tub in the water under the pig. Then we use the chains to agitate the pig in the water, if necessary, to keep the hide from sticking to the hot metal of the scalding vat and to readjust if some areas aren’t underwater.
Air temperature impacts scalding time. Also, every hide is different. Start pulling on patches of hair after about 2 minutes of soaking onward. As soon as the hair is easy to pull out, raise the pig out of the water and immediately start scraping. Scalding too long sets the hair.
Also, keep a bucket handy. If areas of skin start to cool before you get them scraped, pour hot water from the scalding tub over the area to warm it up.
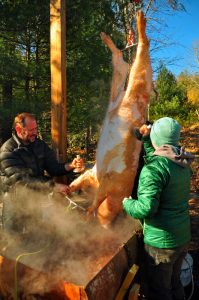
Photo by Tim Miles
Scraping
When you get a good scald, scraping is easy using a tool called a bell scraper. It’s not very sharp and the handle and the cupped shape of the blade work well to scrape the hair without ripping the skin.
We scrape the hams, back, belly, and jowl areas first while the scraping is easiest. After we have our key areas hair-free, then we work on the hocks, the rest of the head, and the front shoulders. Removing the hair on these parts of the hide is less critical for our later processing.
For tough patches, we use flat razors or even dull knives to fine-tune our scraping job. Once the carcass is scraped, hose off residual hair and hang the carcass at a height that makes it convenient for you to squat down and remove the head.
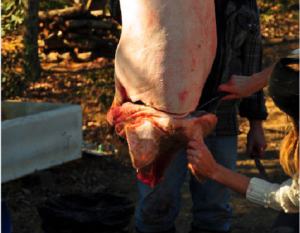
Photo by Tim Miles
Step #2: Remove the Head
To remove the head, you need to cut a ring through all the meat and ligature down to the bone. We cut high on the back of the head so we leave more meat with the shoulder area. We cut below the jowl meat on the nose side so we can make bacon from the jowls.
After you have cut through to the bone all around, have one person hold the carcass steady while another twists the head by holding the ears. The head will twist off. You can manage this alone, but it’s easier with two people.
If the head doesn’t come off with twisting, you probably still have some meat or ligature to cut through. You should not have to saw through the spine to remove the head.
Step #3: Disconnect the Rectum
Hang your carcass at a height where you can easily reach the anus.
Pigs have chubby cheeks—and yes, I mean butt cheeks. This makes it hard to get your hands where you need them to cut out the rectum and tie up the anus. The first thing I do is cut through the pelvis bone on the belly side of the pig to give myself more space to work.
As a rule, cut meat with a knife and bone with a saw. I slice through the meat covering the pelvis bone and then saw through the pelvis bone. Similar to a human pelvis, the organs are behind the pelvis bone. As long as you aim your saw toward the sky through the legs of your pig and stop sawing as soon as you break through the bone, you won’t hit anything dangerous.
Also, similar to a human stomach, there is a layer of fat underneath the skin area just above the pelvis, so as long as you don’t cut through the fat while you are starting this process, that is a fairly safe zone, too.
With the pelvis bone cut, I cut a wide round hole around the anus to make sure I don’t hit anything important. Then I connect the line I started at the pelvis bone up to my circle cut around the anus. This way you can see the shape of the rectum (the poop pipe connected to the anus) and avoid puncturing it. You can use your fingers and the tip of your knife to cut the connective tissue holding the rectum in place.
Work carefully with your knife until the rectum is freed and can be pulled up a couple of inches to allow you to tie it off with twine to prevent spillage. Do not remove the rectum at this point, the goal is just to free it up so you can pull it through with the other internal organs from the belly side.
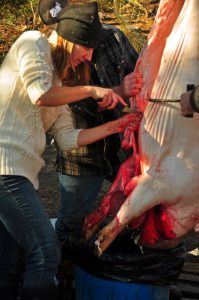
Photo by Tim Miles
Step #4: Risks in Evisceration (Gutting)
When we first started processing pigs, I was terrified of evisceration. Every article I read about hog processing emphasized not to accidentally cut the intestines like it was a criminal act.
There are some bad things that could be lurking in your pig’s intestinal tract. Bacteria and parasites like Salmonella, Campylobacter, Trichinella spiralis, Toxoplasma gondii, Listeria monocytogenes, methicillin‐resistant Staphylococcus aureus, and Escherichia coli can all be found in a pig’s gut.
In fact, except for Trichinella spiralis and Toxoplasma gondii, which have mostly been eradicated from modern pork production, these bad things are commonly and routinely found in retail pork products from your grocery store or local butcher! Yet, despite being the most consumed meat worldwide, pork products have lower rates of foodborne illness than other meats.1)https://onlinelibrary.wiley.com/doi/full/10.1111/1541-4337.12001
Pork products are only relatively safe to eat because they are chilled, well-cooked, or long-cured prior to consumption. As long as you apply the same processes to your pork products at home, your risks are the same at home as they are at the grocery store. Even if you bust a gut!
Busting a gut is stinky and messy. It also makes extra work because you will want to carefully hose off your carcass. So, do be careful, just don’t be paranoid! And keep a hose handy just in case.
Step #5: Remove Internal Organs
Pigs have large chest cavities and a lot of ribs. Before we begin cutting through the belly to free up the organs, we like to cut through the breastbone. Like you do with the pelvis, slice through the skin and muscle tissue over the hard sternum. Then use a saw to cut through the breastbone. Keep your saw parallel to the breastbone and stop sawing once you break through the bone.
As explained in the skinning section, in male pigs the penile area and urethra needs to be freed up and moved aside before you start cutting into the belly to get to the organs.
Now, get your gut bucket ready. Position it under the neck area of the pig, between your legs, while you face the belly. Insert your knife carefully under the fat and tissue where you cut the pelvis. Face your knife blade back out toward you from underneath the pig’s belly fat and skin so it is facing away from the organs. Cup your hand around your knife, to use the back of your hand to hold back the organs inside your pig and prevent punctures. Then cut a seam down the belly.
As you start to unzip the pig, the organs will start to fall toward you. Direct them toward the bucket between your legs. Once your seam connects to where you cut the breast bone, use your fingers and your knife to rip and cut any connective tissue and free up the organs. There are shiny whitish diaphragms on either side of the ribs along the back that need to be cut free with a knife and scraped out. Otherwise most other organs you can work free with your hands and occasional cutting.
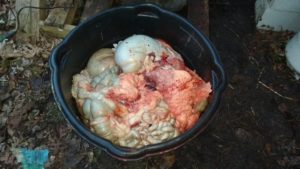
We keep the kidneys, heart, caul fat, lungs, and liver (remove the gall bladder). I separate those out as I come across them and put them in a different bucket.
For our friends who use a front loader in their pig slaughter, they don’t use a gut bucket. They drop the viscera on the ground and scoop them up later with their front loader and bury them.
The important thing is to have a plan for how you will dispose of the parts you don’t want to eat. We dig a large trench in advance and bury the organs right after processing to avoid drawing unwanted animals to our slaughter area.
Step #6: Chill the Carcass
At this point, you have a hanging pig carcass that has been split from sternum to anus. The carcass will still be warm, especially if you scalded the pig. To make butchering easier, you want to chill the meat and allow the fat to firm up.
Most people try to process when the overnight temperatures will be close to refrigerator temperatures so they can allow their pig to hang outside or in an unheated outbuilding to chill.
Make sure to chill your pig in a location where it won’t be bothered by other animals like coyotes. Hanging high, under lights, or in shelters can help.
We Want to Hear From You!
Have you processed a pig? Do you have any tricks to share? Are you thinking about it? What are your concerns? Please use the comments section below to share your views and experiences or to ask any questions.
Also, if you’d like to read more on hog processing before we move on in the series, you can check out my earlier posts from my first time processing pigs:
Read More: “Part 1: Raising Hogs”
Read More: “Part 2: Hog Killin'”
Read More: “Part 3: Hog Cookin'”


Tasha Greer is a regular contributor to The Grow Network and has cowritten several e-books with Marjory Wildcraft. The author of “Grow Your Own Spices” (December 2020), she also blogs for MorningChores.com and Mother Earth News. For more tips on homesteading and herb and spice gardening, follow Tasha at Simplestead.com.
References
| ↑1 | https://onlinelibrary.wiley.com/doi/full/10.1111/1541-4337.12001 |
|---|


COMMENTS(5)
We’ve got a friend that is just a pro at this kind of thing. He and his family have raised hogs for us on their property, and this one time I went to “help” him process one. But my “helping” was mostly just standing around making conversation. After I saw him zipping along like he’d done it a thousand times (because he had), I knew I was only slowing him down.
So I stepped back and had an impromptu homeschool lesson with my kids. “This is a kidney. That’s the heart. That’s…another heart? No. That can’t be right. Why does this pig have two hearts? Did it eat another pig and assimilate the organs?” I’m telling you, that pig had extra parts. 😮
I was worried that the muscle twitches would freak my kids out, but I think it was their favorite part.
In the end, we took the bacon home, cooked it up, and… it was awful. 🙁 So sad. The pig in question was…what would you call him? He was a pig-of-opportunity that we happened to procure for free. He was not a pig for eating. Yuck. Oh well. Better luck next pig.
How great that you made a homeschool lesson out of this for your kids, Scott! Sad to hear that the final outcome was less then desirable, but the memories and experience are definitely a benefit! 🙂
Sounds like you needed to use a slow cooker and a lot of spices to make that pork tasty! Sorry the bacon didn’t pan out. But I think you did a great thing in helping your kids understand where food comes from and what it “costs”.
May we one day realize that holding animals captured, to be killed for food… is not so kind to the animals… Today we can each one survive and thrive on vegan products… so why not go vegan as much as possible…
Thoor – I really appreciate you sounding in here. I am not a vegan (obviously), but I do eat a lot less meat than your average American. The animals we raise are very comfortable and well-cared for. I promise you they would not rather be free-ranging without all the comforts we provide them. But I do take your point. Particularly now that I do raise and process animals, I eat a lot less meat than I used.
Growing large enough quantities of vegetables is really hard though. In about 5 years when our fruit and nut trees start producing heavily, I think we will be able to eat a lot less meat.