CAUTION: This article, and the photos in it, include graphic details about pig slaughter. If you are disturbed by information and images of this nature, please use your own discretion when determining whether to read further.
Raising and processing your own pigs at home is a great way to provision your family with a year’s supply of meat. If you start with weaned piglets that are about eight weeks old, it takes around four to six months to raise your pigs to “market weight,” which is around 250 pounds.
A 250-pound pig, also called a hog, will yield about 140–145 pounds of meat products. Anything you can’t eat, you can trench compost to improve your soil (assuming you have a place on your property at least 50 feet from your wellhead or watershed to dig a trench). And if you want to do some extra processing, you can also grind bones into bonemeal for your garden and make a year’s supply of bone broth to up your protein and gelatin intake.
Read More: “Benefits of Bone Broth: Myth or Magical Mystery?”
Raising pigs is the easy part. They simply require adequate space to root inside a really robust electric fence, fresh water, a lot of food, and a three-sided shelter for weather protection.
Training your pigs to the wire when they are small is important, and if you can find piglets that are already wire-trained, that’s even better.
When they are young, or if you raise them through winter, you may also need to give them some bales of straw to use as bedding to help keep them comfortable and avoid weight loss during cold spells.
Planning for the slaughter, though, can be a bit daunting.
Technically, you can field dress a pig, like you would a deer, by basically removing the guts and hide. But, if you plan to make any kind of fancy products like bacon and cured ham or pork rinds, then you really want to think about your setup and plan to have on hand all the necessary equipment that will make your pig slaughter as easy and organized as possible.
Here’s what we do to get ready for our hog processing each year.
Assemble Your Team
One person can slaughter a hog. But we find that having two to four people available to help makes the process a lot easier. And if you plan to make it a whole-day event and do multiple pigs at once, like we do, having more help for shift relief makes things go much faster.
We tend to make our hog killings a bit of a community event by inviting friends interested in learning to come for the experience. However, making sure that you or your helpers have the necessary skills for each task is the most important factor.
We tend to plan our team with the following skills in mind.
The Shooter
If you get in the habit of standing in front of your pigs while you feed them, your shooter will basically be able to shoot the pigs at almost point blank when processing day comes. This way, there is no chance of missing the mark. But, even with such an easy target, an experienced shooter is a good team member to have. We also like to have a second shooter ready just in case something goes wrong with the first shot.
The Sticker
This person sticks the pig in the heart to bleed it out after the shot drops the pig in convulsions. The sticker can also be the shooter, but in this case, you’ll need someone nearby for the shooter to pass the gun to. That person can then put the safety on the gun, and put the gun back in its case so no accidents happen. Alternatively, you can set up a chair, table, or even picnic blanket to set the gun on if your shooter is your sticker and there is no one there to take the gun.
The Heavy Lifters
We personally raise our pigs a bit bigger than 250 pounds, so we like to have two strong people who can help haul the pigs the 15–20 feet from their paddock down to our scaffold.
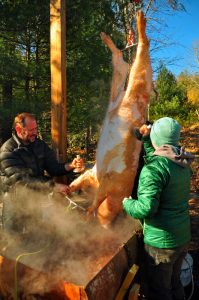
Photo by Tim Miles
The Skinner or Skin Scrapers
If you plan to skin your pig, that’s pretty much a one-person job. But if you are scraping, a few extra hands get the job done quicker. Up to four people speed up the process, but if you get more than four sets of hands on the hog at once, you just start running into each other and flinging hair on the person below (yuck).
The Gutter
Gutting is delicate work, but intestines are also heavy. So you want someone with steady knife skills and the ability to hold back 40 pounds of innards with their elbow during the “unzipping.”
The Splitter
Splitting a hog carcass down the spine with a saw is extremely physical work. You can use power saws to make it easier. But it still requires a fair bit of strength and stamina. It’s also a bit easier if you have two other people hold the sides of the carcass to steady it while the person operating the saw cuts through.
The Butchers
You need one skilled butcher who can find their way around a carcass to cut off the bacon, hams, Boston butts, etc., and who can distinguish pork chops and roasts from sausage meat. But after those initial cuts, butchering is the part of the process where more hands really make light work. Quite a bit of hog processing is sausage making, and that means cutting your meat and fat into chunks or strips that will fit in your grinder. There is also a lot of curing and packaging to be done. So if you want to involve people interested in learning, this is the part of the processing where almost anyone can get in on the action.
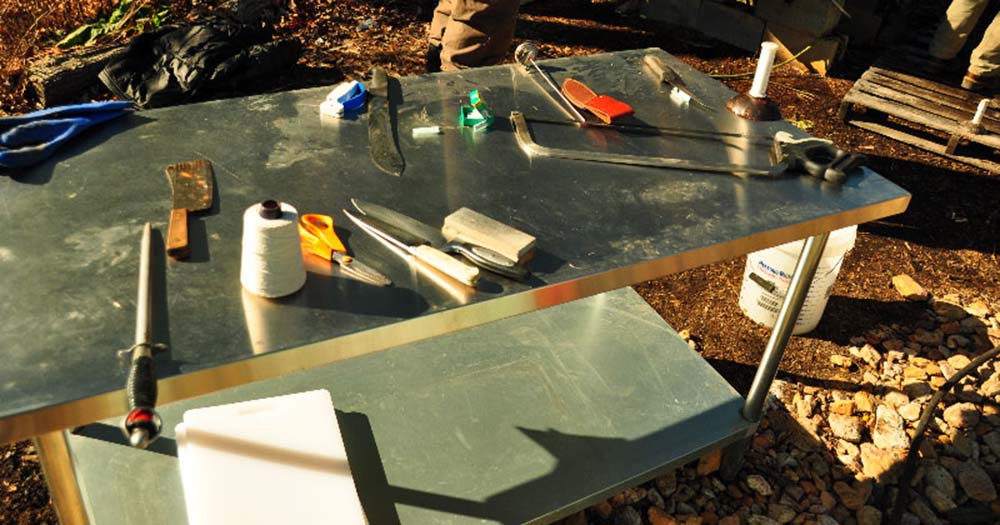
Prepare Your Equipment
Beyond having the right people with the right skills lined up for your pig slaughter, you also need to prepare your equipment.
We’re minimalists on the equipment front because we like to do things fairly “old school.” But we still have a pretty lengthy list.
Here’s what we use:
General
- Deboning Knives—For gutting, head removal, and butchering
- Knife Sharpener and Steel—For knife maintenance, as needed
- First Aid Kit—With lots of bandages, disinfectant, and superglue to close skin cuts
- Disposable Gloves—In case you get cuts that bandages won’t stick to and for anyone who prefers to work with gloves
- Three Five-Gallon Buckets—To set up a washing station outdoors; we fill one with soapy water, one with bleach, and one with clean water to use for cleaning equipment, hands, and whatever else you use during processing
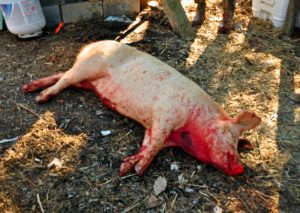
Photo by Tim Miles
For the Kill
- .22 Rifle With Bullets—For stunning the pig
- Sharp-Tipped Knife—For sticking the pig to bleed it out
- Two Ropes—To drag the pig down to our processing area
- Hose—To wash the pig off before scalding
For Scalding and Scraping the Pig
- Scaffold—For elevating the pigs into the scalding vat; a front loader or tripod will also work
- Two Engine Hoists—We hang one over the scalding vat and another next to it to use to hang the pig for gutting. You can also gut the pig on a pallet on the ground if you only have one engine hoist.
- Scalding Vat—Large enough to hold an entire pig, ours is a 250-gallon oil tank cut in half and welded into a horseshoe shape. For smaller pigs, 55-gallon drums work, too.
- Hose With Sprayer Nozzle—With access to a clean water supply for filling scalding vat and using to wash the pig, hands, tools, etc., during processing
- Cinder Blocks—For stabilizing scalding vat
- Chains—For use to agitate the pigs in the scalding vat to keep them from sticking to the bottom (if the flame is on, as it often must be in cold weather)
- Two Gambrels—These are placed through the front and back legs and used to hoist and direct the pigs when lifted and lowered onto the scaffold.
- S-Hooks—For attaching the gambrels to the engine hoists
- Propane Tanks and Burners (or Lots of Wood)—For heating the water in the scalding vat
- Thermometer—For checking water temperature prior to scalding to make sure you reach 150–155ºF
- Bell Scrapers—For scraping the hair from the skin
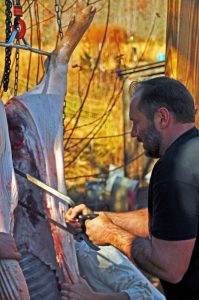
Photo by Tim Miles
For Gutting, Beheading, and Splitting
- Bone Saw—For splitting the carcass and cutting through ribs
- Deboning Knife or Knife with Gut-Hook—For gutting
- Twine—To tie up the anus
- Gut Bucket—A really large bucket to catch the guts and store them until you get a chance to take what you need and bury the rest
- Smaller Bucket—For the organs you plan to keep, like the liver, heart, and kidneys
For Butchering, Processing, and Packaging
- Large Cutting Boards
- Large Cooler—This works great to hold the heads until you process. Just leave the lid off so the heads stay as cool as it is outdoors. Then, after you process the heads, you can use the cooler to organize your cuts until they can be packaged.
- Lots of Buckets (or Pots, Bowls, and Whatever Large Vessels You Have)—For holding fat or meat chunks; and to use to brine heads, for curing bacon, etc.
- Pressure Canner—For making stock and head cheese and to use to can stock and lard after processing
- Slow Cooker or Other Large Stove-Top Pot—For making lard
- Canning Jars and Lids—To hold stock and lard
- Meat Grinder—For making sausage
- Sausage Stuffer and Casings—If you plan to make links
- Vacuum Sealer With Bags, Butcher Paper, or Freezer Bags—For packaging
- Food-Grade Scale—For weighing cures and meat cuts, etc.
- Permanent Marking Pens—To label your packages
- Pillow Cases or Old Sheets—To use for curing hams
- Parchment Paper and Twine—To use to keep the cure in place on the hams
- Rope—For hanging hams
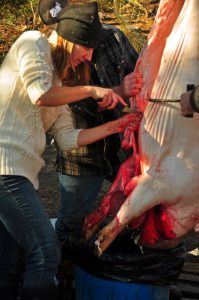
Photo by Tim Miles
Storage, Space, and Special Planning Considerations
In addition to the equipment necessary for processing, you also need to make sure you have the space to do this. Pig slaughter is easiest when you have room to move and have planned where you will store everything while you work through that large amount of meat.
Short-Term Needs
You will need some fairly big, sturdy tables to work on. We have a stainless-steel table for breaking down the carcass and a really large picnic table that we cover with plastic and use to cube and cure meat. If it is really cold, we also use our indoor dining table covered in plastic and our kitchen island for doing the curing and bagging.
A stainless-steel or granite-topped table is also really helpful if you plan to make sausage links.
You will also need some equipment for safely storing your meat overnight so you can finish processing the next day. We put some of our meat on pallets in a truck bed, tied it in with tarps, and covered it with chairs to deter critters. We also hung some of it with our engine hoists.
But if you have a secure, unheated outbuilding, that would work best.
You will need a place to store your bacon while it cures for 14 days. You need to flip the bacon once a day, so this location should be easy for you to access. We usually use the same cooler we used for heads and cuts, and keep it on our front porch so we remember to flip the bacon daily.
Long-Term Needs
You need a place to hang your hams to dry for 60–75 days while they cure and for another 6–18 months while they age.
You need a freezer to store your bounty of meat for the year.
Special Considerations
If you plan to make fermented sausage, you will likely need a fermentation chamber to control humidity and temperature for a 30-day curing period or longer.
If you plan to smoke your meats, you will also need either a hot or cold smoker, depending on your preference. Cold-smoking is used for flavoring meat after it is cured by other methods (e.g., salt and Insta Cure). Hot smoking is usually applied to meat that will be used quickly or frozen.
Plan Your Recipes and Prepare Your Ingredients
We are total foodies, and so half the reason we raise our own pigs is so we can make our own gourmet products at home for a fraction of the cost we’d pay at gourmet grocery stores.
Before we ever set the date for processing, we plan which recipes we’ll use for making bacon, ham, and any other cuts we want to cure.
We decide what kind of sausage mixes we plan to make. Then we shop for items we don’t grow ourselves and make sure we have adequate stocks of everything else.
Regardless of which recipes we use, we always need large quantities of the following:
- Sea Salt—For curing and seasoning
- Demarara Sugar—For curing hams and bacon
- Insta Cure No. 1—For bacon and smoked sausage
- Insta Cure No. 2—For dry-cured hams and salamis
- Garlic—For sausage and bacon
- Wine, Beer, Water, or Milk—For sausage liquid
- Spices—Marjoram, oregano, paprika, black pepper, cayenne, thyme, rosemary, fennel seed, etc.
I also like to make up my mixes for bacon, ham, and most of our sausages in advance of processing so that we don’t have to worry about tracking down ingredients when the meat starts coming off the carcass.
For example, I’ll make up ham cure in 50-pound increments, but then I’ll weigh the cure, divide by 50, and leave a note on the cure indicating how many ounces of mix to use per pound of ham. This year it was 1.2 ounces of cure to a pound of ham. So, my helpers weighed the hams. The first was 28 pounds. They then weighed out 33.6 ounces (1.2 ounces x 28 pounds of meat), and rubbed that into the hams before wrapping.
I also had parchment paper, twine, and pillow cases all ready so they could get the hams ready for hanging.
I do the same with the bacon cure.
I also prepare sausage spices in 20-pound batches so that as soon as we’ve got 20 pounds of the appropriate quantities of meat and fat ground, we can immediately start mixing up our first batch of sausage.
Check the Weather and Make the Final Call
About three days before our pig slaughter, we check the weather and make sure we are on track for our proposed date. Rain or excess wind are deal breakers for us, because we do most of our processing outdoors and we want to be as comfortable as we can be while we are doing this. If you have a large outbuilding to use, your considerations may be different. For us, we like daytime temperatures in the 45°F–55°F range and hovering above freezing overnight. If the weather looks good, we alert our team and start setting everything up.
We check the weather again the day before just to make sure our forecast still looks good. This year, we had a snow storm sneak up on us on our first planned date. So we had to cancel the day before. But the next weekend turned out to be perfect.
Even with good preplanning, you’ll inevitably forget something. Part of being prepared is knowing that you’ll still likely have to do some improvising the day of. Flexibility and ingenuity are also key skills that you want every member of your team to have.
Pig slaughter requires a lot of preparation and work, and you should know that going in. However, I find that if I keep in mind the fact that I am literally provisioning most of my meat supply for the entire year with those few days of hard work, it’s a lot easier to get through. And, at the end, I have the satisfaction of knowing where my food came from, how my animals were raised, and what went into their processing every step of the way.
I’m pretty experienced at pig slaughter now. But a few years ago, I was a total novice. You can read my posts about a first-time hog killing using the following links:
Then, stay tuned for some new, upcoming posts with more specific details about processing and product making from your hogs at home.
If you have experience at home processing or are thinking about doing it, we’d love to hear your thoughts and ideas. Please share any thoughts or information you have in the comments section below.


Tasha Greer is a regular contributor to The Grow Network and has cowritten several e-books with Marjory Wildcraft. The author of “Grow Your Own Spices” (December 2020), she also blogs for MorningChores.com and Mother Earth News. For more tips on homesteading and herb and spice gardening, follow Tasha at Simplestead.com.


COMMENTS(12)
This was really interesting. I skimmed the article just to have an idea of what goes into this. It’s a little hard to see the pig right after killing, but since I eat them, this is part of it. I am glad it is done with care and thought.
Hey Iris – I really appreciate your bravery in reading this article. Even if you don’t process your own animals, taking the time to really understand your food supply is a great way to make informed choices about how much meat you should eat and what kind of farms you should buy from. Thanks for taking the time and the risk! Tasha
Hey Iris – I really appreciate your bravery in reading this article. Even if you don’t process your own animals, taking the time to really understand your food supply is a great way to make informed choices about how much meat you should eat and what kind of farms you should buy from. Thanks for taking the time and the risk! Tasha
Well done- you covered all bases. The first time I killed a hog, it was by myself. I was a city bred girl, and there was no internet for instruction. I looked around for a place to hoist the carcass, and my eye caught my kids swing set (yeah, I can’t say I was smart). I hooked up the hind feet and started hauling the rope. I pulled and pulled, but the pig was going nowhere. I looked up, and my kid’s swing set was a giant “M”!!!! We live and learn. Got it done and decided never to do that job by myself again. Decades later, I tell that story every slaughter day.
Wow Chris! You are hard core! I don’t think I would have tried a pig on me own. I am sorry about the swing set, but that story is hilarious! A friend of ours has some of his hogs down in the woods and he hasn’t figured a good way to get them hauled up to scald. So, we may end up field dressing them and taking off the hides. That will be a new first for me. I imagine I’ll have some stories to tell after that! Thanks for sharing your awesome story!
Very well presented. It’s a shame you have to preface such a good article with a ‘disclaimer’. If you are a meat eater, you should know how it gets to your plate. I have not participated in any butchering, and to be honest, might well puke the first time I do. But knowing that your food was raised humanely and had a good life, and giving thanks to the animal for the food they are providing for you, is priceless.
I am with you Grammyprepper! I really wish people would be more comfortable knowing where food comes from. I think we’d all make different decisions if we really had to think about the details. Killing an animal is always hard. But doing it well is part of being good stewards of our domesticated livestock. I started processing with chickens and ducks before I moved on to a pig. I was also lucky enough to have a friend show me how the first time. If you can learn with someone experienced, it makes it a lot less stressful. I know you’ll do fine your first time, because your heart and mind are in the right places. Best of luck to you! Tasha
Thanks for writing this. Lots of great info and things to consider before attempting yourself. My husband and I would like to have a small farm someday where we can do this. Being a integral part of the process the entire way is something I would love to experience.
Hey Michelle – I worked in an office in DC and lived in the burbs before I started a farm. So, I can tell you from experience that you can absolutely do it. Even before you make the leap though, you can start to skill up by helping others who farm and homestead. Poultry is a great place to start. Sometimes, on farm processors need extra hands for eviscerating and bagging. It never hurts to ask. Best of luck to you in making your farm dreams come true! Tasha
It all looks great, but it is not for me. I buy a front shoulder for 99 cents a lb. for my kielbasa and anything else I want to make. We don’t consume Ham or Bacon. We use around 10-12 lbs of pork chops per year.
Here’s what I look at:: Price of little Pig $$$ Price of equipment $$$ Heating water, Rope , block and tackle, what ever , $$$$$$$ Curing–seasoning–Smoker ect-ect.. $$$$$$$$$$. Feeding, purchasing feed, $$$$$$$ Housing , beding $$$$, Gun-Bullets, $$$$$, Paper to wrap $$$$$.
Freezer ect-ect.$$$$$
All of this cost money$$$$. Time is money, from the purchase of the pig to the freezer.
No disrespect to anyone. Thanks for the show! Helen Jake.
Hey Helen Jake – You are totally right! There are a lot of start-up costs for raising and processing your own pigs. And, there are usually feed and piglet costs every year.
Excluding the initial equipment investment, all-in (packaging, ingredients, propane, pigs and care, etc.), we spend about $3.00 per pound of packaged meat raising our own pigs. Before we raised our own, we bought pasture-raised pork from farmers in our area at an average of about $8.00 per pound. So, for us, we end up saving money. But we certainly can’t come close to beating $.99 a pound!
We also use the pigs to clear, till, and fertilize our land fertilize since pigs are a whole lot cheaper than a tractor.
Raising pigs makes sense for us. But it is definitely not right for everyone. And doing the math is an important first step in deciding whether pigs are a good fit for your homestead.
It sounds like you really know how to stretch your budget dollars and still live the good life with gourmet goodies like homemade kielbasa. I really appreciate you taking the time to read the post and share your perspective.
I’d also love to know your kielbasa recipe if you would be interested in sharing it.
Best to you!
Tasha
It amazes me how plain stupid some people are when it comes to their food. I talked with one woman who was opposed to hunting and raising animals for food. Her rationale was that people should just get their meat from the meat market so that animals wouldn’t be killed.. Maybe she should run for Congress??