Welcome to the Organic Growers’ Tool Kit Series
Tool #2: The Mason Jar Test
In case you missed blog #1 in this series, here’s the link.
Read Article #1: “The #1 Tool for Organic Growers”
Read More Articles in This Series: The Organic Growers’ Tool Kit Series
As Marjory Wildcraft always says, “All true wealth comes from the ground.” And she is so right . . . which is why we started this series with a look at some of the key difference between being dirt poor and having rich soil. In that post, I also detailed some reasons why Organic Matter is the #1 tool in my Organic Growers’ Tool Kit.
In this post, we’re going to dig deeper into our soil to determine soil texture type. Then, more importantly, we’ll touch on some ways to use that information to improve soil and successfully grow food at home. Let’s get started.
Go Play in the Dirt

For your first assignment, go play in the dirt! Really!
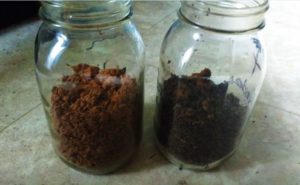
Use your hands (or garden tools if necessary) to loosen up the top 6 inches of a square-foot-sized section of your garden (or soon-to-be garden area). Dig out any weeds. Shake loose the soil on those roots so it stays in the ground.
Mix up all those layers of soil really well. Till it with your hands. Pick out any rocks.
Try to “feel” what kind of materials are in your soil. Clay is thick and heavy and sometimes hard as a rock. Silt is silky and slimy. Sand is grainy. Humus (organic matter) is light and fluffy or spongy when wet.
Were you able to break up your soil with your bare hands? Did you have to get out a shovel or hand tiller? Was your soil moist? Did you run across clumps? Were there lots of little critters?
Based on this direct experience, take a guess at how much clay, sand, and silt you have in your soil. (Ignore the humus or organic matter content in your soil for now. We’ll pick that up again in future posts.)
Write down your best guess for your percentage of each.
Clay % _________
Silt % __________
Sand %_________
Total = 1oo%___
Prepare Your Soil for Testing
Beyond getting your hands in the dirt so you could experience your soil like a plant would, I also had you do that exercise to prepare your soil for a simple soil test.
Getting a Representative Sample
When you do soil tests, you need to dig down as far as your plant roots are likely to grow to seek nutrients. Then, mix your soil layers—like you just did—to get a representative sample of what materials a plant will have access to.
For most vegetables, 6 inches is deep enough. If you are planting things like trees, then you want to dig down a few inches deeper than your root mass will be.
Applications for This Technique
This soil-mixing technique is the same process used for comprehensive soil tests, such as those you send out to laboratories. We’ll also use another variation of it when we test soil pH in the next post in this series.
Some people use a shovel to dig and fill a bucket with soil. Then they break up the soil and mix it in the bucket. Personally, I feel more in touch with my soil if I do my breaking up and mixing right in the ground. But, either method works just fine.
Today, we’re going to do a no-cost, at-home test that you’ve probably come across on other websites. It’s quite a popular subject because it’s so easy to do and gives you great information about the state of your soil.
It’s the Mason Jar Test—and this is your Organic Growers’ Tool #2.
Perform the Mason Jar Test
Now that you have your soil mixed up down to 6 inches, you probably don’t need fancy instructions to do this test. But just in case you want the in-depth step-by-step, here’s a nice PDF instruction set for your reference.
Read More: Mason Jar Test PDF (from Indiana Wildlife Federation)
OR, just use my down-and-dirty numbered list, below, to get this done!
- Fill half of a quart-sized mason jar with your soil mix.
- Fill the rest of the jar, up to the bottom of the lid collar, with water.
- Optional: If you want to get fancy, add a teaspoon of laundry powder or water softener to the mix.
- Close your jar and shake, shake, shake. Shake your mason jar! (Come on, sing it with me . . . .)
- Leave the jar on a level surface, undisturbed, for at least 24 hours.
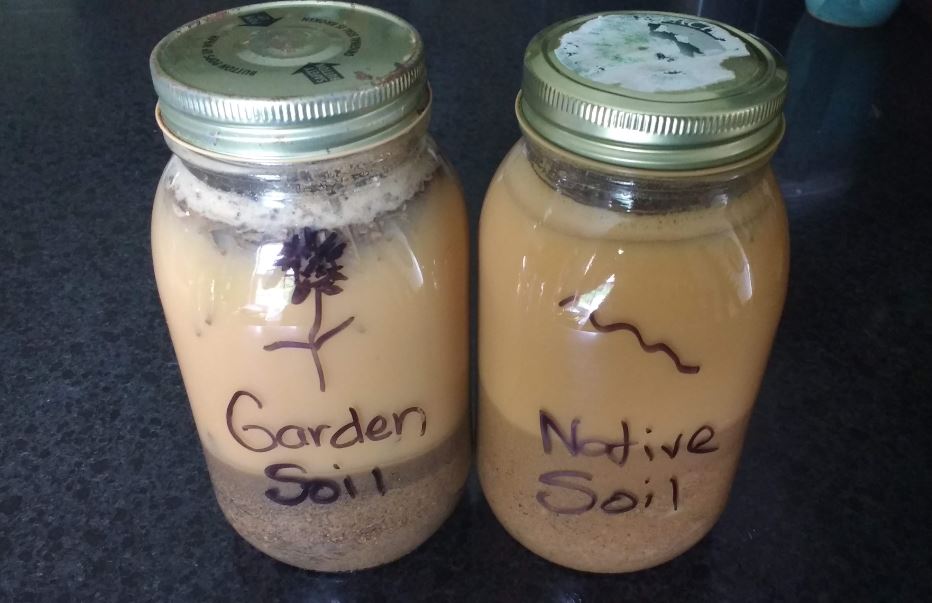
You can see my soil samples above. One is from my vegetable garden that has received 4 year’s worth of organic matter applications. The other is what our garden soil looked like 4 years ago. Can you guess which one I grow food in?
Get Your Results
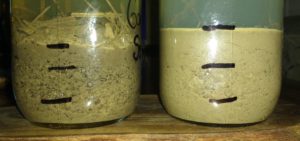
Without disturbing your jar, use a marker to draw lines between the three most obvious layers you see. Now, you may want to get tricky and say, “But I see 6 layers.” And you’d be right. There are different particle sizes of clay and sand that might make more than 3 distinct layers.
For the purposes of this test, though, you really just want to get a good idea of how much of your soil is sand, silt, and clay. Sand, as the largest particle, will settle on the bottom. Silt, which is somewhere between sand and clay in terms of particle size, will take up the middle section. Clay, being the smallest particle and slowest to settle, will sit on top of the other 2 layers.
All of your organic matter will settle on top of the clay or float at the top of the jar. We’re going to ignore that for now. But if you’ve got lots of stuff in that layer and floating—YEAH for you! That means our Organic Growers’ Tool #1, organic matter, is at work in your soil.
If your water is really murky after 24 hours, you’ve got some really fine clay particles in your soil. If you used the laundry soap, it would have helped settle those fine particles faster. However, for the purpose of this test, you really just need the water to be clear enough to see your layers.
Now you need to assign percentages to the three layers. You can get out a ruler and measure. OR, you can just eyeball it and make a reasonable guess.
Clay % _________
Silt % __________
Sand %_________
Total = 1oo%___
Which sample in the photo above do you think is my garden soil?
If you guessed that I got tricky and switched them up, you’re right!
The soil on the left is my garden soil. The clay content has gone down, the silt content has gone up, and there’s lots of organic matter at the top. That’s the magic of lots and lots of organic matter inputs.
Survey Says . . .
There’s one more part to this test.
Calculate your soil texture type here: NRCS USDA Soil Texture Calculator
Enter your estimated percentage of sand and clay. Then click on “Get Type.”
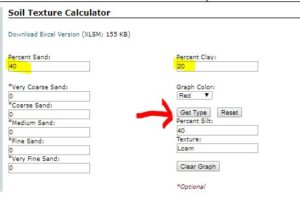
Scroll down to the bottom of the page and see your results on the soil texture type pyramid.
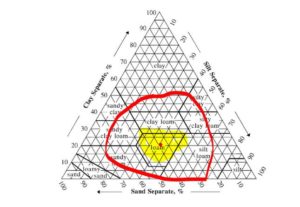
Did you land in the center of the bull’s eye? If you did, wow! I am so jealous! That means you have loam—soil that has approximately equal parts of sand and silt, with a lesser amount of clay thrown in for good measure.1)https://www.thespruce.com/what-is-loam-1401908
If you didn’t, don’t worry. I didn’t either. The native dirt that I started with is hard-core clay. However, through diligent efforts, I have moved the meter from clay to clay-loam in my garden.
Now, honestly, there’s no place like loam—for growing a vegetable garden. So, unless you already have loam, consider whatever soil texture type you have as a starting point for building your own loam.
Time for Reflection
I am about to tell you a simple, but often hard-to-accept, truth about how to use this test and what it means for your garden:
No Loam = No Vegetables
If your soil texture results did not include the word “loam” (i.e., clay-loam, sand-loam, silt-loam, or loam), do not even attempt to grow a vegetable garden in that soil.
OUCH! I know, the truth can be painful. Trust me, though, that advice was intended to save you a whole lot more pain later.
Now, you can still grow a garden in that location . . . just not in that exact same soil. You’re going to need to make some big loam improvements before you can move your vegetables in.
Loam-Lite Might be Alright
If you had the word “loam” linked with “sand,” “silt,” or “clay,” then you will need to apply organic matter to your garden, and probably some other amendments, as well, to get good results. However, your dirt is already on the road to becoming soil. And more soil = less toil.
Self-Evaluation
Before we look at some specific strategies for using your test results, take a moment for self-evaluation. How did your personal soil estimates stack up against your actual results? What can you learn from this?
As Masanobu Fukuoka famously said:
“The ultimate goal of farming is not the growing of crops, but the cultivation and perfection of human beings.”
As an organic grower, you are cultivating not only your gardening skills, but also your relationship with nature. You are now a citizen of the soil. What does your soil have to teach you?
Learn More: “No Till Gardening: Homesteading Basics (VIDEO)”
How to Improve Loamless Soil
Loamless soil is the weediest soil of all. Because those conditions are so inhospitable to cultivated food plants, well-adapted weeds will treat any improvements you make to clay, sand, or silt like lottery winnings. They’ll go wild, throw big parties, bring the family, etc.
You’ll end up spending all your gardening time weeding. Likely, you’ll lose heart and think that gardening is hard.
Truth is, gardening is easy. Weeding is hard. But to get from being a weeder to being a gardener, you need to create an environment suitable for gardening.
Shortcuts to Gardening in Loamless Soil
Don’t waste time planting in loamless dirt! Instead, use 1 of the following techniques to fast-track soil transformation:
- Build raised beds and fill with the best-quality garden soil you can afford or steal.
- Make hugelkultur beds topped with 4-6 inches of garden-quality topsoil.
- Sheet mulch to a depth of at least 12 inches and cover your layers with a few inches of topsoil so you can plant immediately.
- Take the long-term approach and rotationally graze animals in that area for a couple years before using it as a cultivated food plot.
Avoid Incorporating Amendments
Most standard gardening recommendations tell you to till in your amendments. However, I would avoid this for loamless soil texture types.
In clay soils, incorporating amendments can actually lock up nitrogen so plants can’t use it. In silty soil, incorporating organic matter can create stagnant conditions. In sandy soils, organic matter will just rise to the top with regular watering anyhow, so why bother?
Nature applies organic matter from the top down. From what I can tell, nature seems to know a thing or two about making soil.
Loam-Lite Soil Amendments
If you fall into the loam-lite camp, as in clay-loam, silt-loam, or sand-loam, your soil is already in shape for growing food—so long as you keep adding organic matter. You also want to keep your soil continuously planted year-round (i.e., using cover crops in off seasons) so that you don’t become loamless.
Annual top-dressed applications of well-aged compost and mulch (e.g., straw, shredded hardwood, mulched leaves) will keep moving you in the direction of the promised land of loam.
Until you achieve loam, choosing vegetable varieties suited to your specific loam-lite conditions will increase your garden productivity. Also, amend and water for your soil texture type.
Here are some ideas to get you started:
Sand-Loam
Long carrots love sand-loam even more than loam-loam. Plants that form edible parts well below ground level, like potatoes and peanuts, are good choices for sandy-loam, too. Use shorter varieties of tall plants, like corn, since they can be easily uprooted by wind and heavy rain in sandy soils.
Water often during dry periods as sand-loam dries out fast. You may have to apply fertilizer and mineral supplements in periods of heavy rain, even with heavy applications of organic matter, since sand-loam is so well-draining.
Silt-Loam
Most vegetables will grow reasonably well in silt-loam. Tap-rooted vegetables can be subject to root rot in prolonged wet periods. Focus on root vegetables that form in the top few inches of soil, like ball beets and turnips.
Water only when your soil dries out. Apply extra mulch during heavy rain years. Use mounded beds if necessary to minimize risk of poor drainage.
Clay-Loam
Grow ground-breaker vegetables like daikon radishes, sweet potatoes, and parsnips in clay-loam. Choose shallow-rooted varieties of beets and carrots. Grow potatoes above ground or in extra-well-prepared trenches.
Mulch as needed to keep the fine particles of clay that settle on top of the soil from forming an impenetrable crust.
Use Your Soil Texture Type to Plan Your Garden
Your soil texture type can change from year to year if you are adding organic matter, cover cropping, and encouraging soil biodiversity. Repeat this test before planning your garden each year.
Do specific research on your soil texture type. Use that knowledge to determine your planting lineup and organic amendments. And throw a loam-coming party to celebrate your successes!
What Do You Think?
Please share your soil results and any insights you’ve gained using the comments section below. Also, if you know things that grow well in your soil texture type, let us know!
Read More Articles in This Series: The Organic Growers’ Tool Kit Series

Tasha Greer is a regular contributor to The Grow Network and has cowritten several e-books with Marjory Wildcraft. The author of “Grow Your Own Spices” (December 2020), she also blogs for MorningChores.com and Mother Earth News. For more tips on homesteading and herb and spice gardening, follow Tasha at Simplestead.com.
References
| ↑1 | https://www.thespruce.com/what-is-loam-1401908 |
|---|


COMMENTS(5)
Loved it, Tasha! Lots of detail. My kind of stuff. I wonder if you’d want to write an article with tips for handling rocky soil?
Scott – check out my reply below to “peppypoblano” who has pregnant rocks and clay soil!
Also, my usual approach to rocky soil is to build a hugelkulture or a weed island (https://thegrownetwork.com/from-weeds-to-wow-the-weed-island/).
We had a few spots on our property that were so rocky, they were impermeable to water. They were also on a slope, so in rain they became water slides that facilitated faster erosion for the areas below. Up and over was the only thing that worked for me.
I’ll also look into writing something more comprehensive on rocky soils in the future. Thanks for the suggestion!
Tasha
I was told we have pregnant rocks – you dig up one and there are 10 more underneath it. We have to do raised beds. Between the clay and rocks there doesn’t seem to be much of an near term option. It’s so bad in spots even the bamboo can’t send shoots up, the have to run vertically until they can manage to peek a leaf or two out. Thanks for the info. I love details.
Sounds like you and Scott (above) have the same problem with pregnant rocks!
OK – so unfortunately, rocks are not soil or dirt (at least not yet). But, if your rocks happen to have lots of organic matter and nutrients tucked in around them, its still possible for stuff to grow. I know this because the flagstone patio I put down in my outdoor dining area is incredibly productive at growing certain plants.
Thyme, lemon balm, strawberries, curly dock, perilla, several kinds of clover, various annual grasses, anise hyssop, yarrow, evening primrose, and even some stunted grape vines are all growing in minuscule pockets of organic matter that collected in crevices on my patio. (Even though I yank them out or hit them with the weed trimmer as often as I can.)
For those areas where bamboo can’t even move in, have you tried adding a few inches of compost and top-seeding plants that have matting or naturally shallow root systems? Those plants eventually get stunted by the lack of soil and die (after they get a few feet tall), but then they become organic matter and help make more soil.
Also, for reasons I don’t fully understand, plants seem to grow better when there are rocks in the soil. I suspect those rocks are probably slowly shedding minerals through contact with the fungi and bacteria in the soil. I used to dig the rocks out of my soil down to 1 foot in all my garden beds, but now I only the top few inches and then just keep adding organic matter on top.
I do still remove rocks in the beds I use to grow deep-rooted veggies like potatoes, carrots, and parsnips that need rock free soil. Building a few raised beds for those kind of veggies might be necessary in the case of pregnant rocks!
So, please have hope…eventually when you build up enough organic matter on top of your rocks, you may have the biggest fruits and vegetables of all time!
Good luck to you!
This article reminded me that the soil type of my entire property had already been mapped some years ago as part of a state project to determine which areas were best suited for agriculture. So I dug out (no pun intended) the map and other information. It said I have primarily “Tunbridge-Lyman fine sandy loams, rocky”, which should be good for growing, except for the ever-present bedrock and high water table. Now I am wondering if, rather than purchasing soil from elsewhere, it would be practical to collect some of the soil I have, and put it into raised beds. That would solve the problem of roots standing in water or not being able to grow through rock.