
In this final post in our cold-weather chicken care series, I want to offer up a few solutions for how to keep chicken water from freezing even when the temperatures plummet.
In case you missed our earlier posts on cold-weather chicken care, you can check them out here:
- “Cold-Weather Chicken Care: 11 Quick Ideas to Improve Chicken Comfort”
- “How to Prevent (and Treat) Frostbite in Chickens”
- “The 13 Best Chicken Breeds for Cold Climates”
Now for some ideas to warm up your chicken water!
On-Grid Solutions
If I lived in a place where dealing with frozen water was a regular issue, I would most definitely get some power to my coop and use some kind of electric heat to keep my chicken water flowing. Plug-and-play devices—once you have a reliable electricity source installed—are about the most headache-free way of keeping chicken water from freezing in extreme conditions.
Even after you have electricity, you still have some decisions to make on which devices will work best for your purposes.
The Heated Coop
If you are giving your chickens supplemental heat and light to keep them laying in winter, and you have an insulated coop, then you likely just need to keep your water bowl close to your heat source.
If you are thinking about going this route, brooder lamps are a classic go-to for winter heat. But newer technologies like chicken-safe heat walls may require less maintenance, and are definitely better from a fire-safety perspective.
Heating Units That Work With Your Existing Watering Devices
If you have a lot of chicken-watering devices and just want to find a solution that works with what you’ve already got in place, consider these.
Fount heaters, which are basically heated pedestals, can be used with your existing self-watering founts and poultry waterers. They can also work well with the nipple-style bucket watering devices. They often look like an upside down pie tin with an electric cord. A high-quality unit will usually cost around $50.
DIY Fount/Bucket Cinder Block Heater
You can also make your own fount pedestal heater for around $10-$15 using a concrete block, paving stone, lamp socket with cord, mounting bracket, and a 60 or 100 watt bulb. Alternatively, you can use an extension cord and a plugable light socket.
The lamp socket you buy should be rated for use with a 100-watt light bulb. Also make sure you get a good fit between your cinder block and your paving stone to ensure that no water can drip into your light socket and create an electrical fire hazard.
Assemble the light kit, mount the light inside the block, and cover the block with the paving stone. Some people will drill holes to run the cord through the concrete block or will buy notched cinder blocks and use a file to deepen the notch to pass the cord through. If you have an elevated wood floor, you can also just drill a hole in your floor, run the cable through the hole, and set the open bottom of the cinder block over your light.
Plug in your cord. Turn the lamp on. Put your waterer on top of the paving stone. And voilà! The lamp will heat the paving stone and the paving stone will heat your watering device. The concrete barrier also provides some degree of fire protection.
You can build this in just a couple of minutes. In many cases, a 60-watt light bulb will be sufficient to keep the water flowing. But depending on your temperatures and the density of the paver top you choose, you may need to upgrade to a 100-watt light bulb to fully heat your water. As with any DIY project of this nature, you must keep a close eye on your homemade heater to make sure there are no safety issues until you are completely confident that your setup is working well.
Submersible Water Heaters
In addition to pedestal heaters, you can also modify your existing watering systems using a submersible deicer. These work particularly well for watering systems that have easy-access openings at the top. They can range in price from $15-$50 depending on design and quality. Many chicken keepers who live in extreme cold opt for higher-end heating models because they tend to last longer and end up costing less over time.
If you have larger water systems, like Marjory’s 55-gallon drums, then you would need to opt for a higher-powered submersible device. Make sure the device you choose is rated for the number of gallons you plan to heat.
To learn more about Marjory’s watering systems, check out this video:
(VIDEO) Simple & Effective Watering Systems for Small Livestock
Watering Devices With Integrated Heaters
For about the same price as high-quality submersible or fount water heaters, you can buy watering devices with built-in heaters.
This one is not my favorite method because I like to fill up my water containers in my house on cold days and bring a fresh container to my chickens as needed. So, I keep several watering devices ready to fill on my porch and just swap them out as needed. That means I’d have to buy three or four of these waterers with built-in heaters, and that’s a lot more expensive than just plugging in one fount base heater and using my regular fount water containers or buckets.
If your coop is close to your water source, though, then using a watering device with an integrated heater might be right for you.
There are lots more on-grid options for heating chicken water, but these are a few of the more common, tried-and-true methods to consider.
Off-Grid Solutions
Not all of us are able to run electricity to our coops. Luckily, there are some good off-grid solutions to keeping chicken water from freezing. Some of the ideas that follow are geared more towards us hard-core off-gridders who love to tinker and push our homesteading limits. But even if they seem a bit out there, most of these can be adapted to your average suburban backyard.
Easy Fixes: Double-Wall Waterers, the Saltwater Trick, Placement, and Insulation
Depending on your conditions, you may be able to keep water from freezing longer with a few easy fixes.
Metal, double-walled chicken waterers have better insulation and may keep water from freezing a bit longer than your standard single-walled waterers.
Saltwater has a lower freezing point than fresh water. By submerging a plastic bottle filled with saltwater inside your chicken waterer, you can increase the freezing point of the surrounding water. Make sure your submerged bottle is well-sealed and does not leak into your fresh water, though, or you may overload your chickens on sodium.
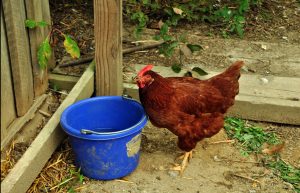
By using a dark-colored waterer and placing it in sunlight, it will absorb more heat and be less likely to freeze even in cold temperatures. I like to use blue or black buckets or black rubber concrete mixer containers set against a south-facing wall on top of dark-gray gravel. The dark containers draw the sunlight. The wall and gravel act as heat sinks, absorbing heat and releasing it back to my water container even when the sun slips behind the clouds or horizon.
Create an insulated water area in your coop, such as by making a bagged wood-shaving igloo. If you use wood chips in your coop anyway, just stock up and use the box-shaped bags as building blocks. Or, create a permanent insulated watering nook inside your coop to buy you lots of time between waterings. Similarly to protecting your pipes, buying appropriate insulation and creating a more weatherproof space for water access might even get you through extended subfreezing conditions.
Keep in mind, if you change your chicken water area in cold weather, you want to make sure they know where to find it. I like to leave a fermented scratch trail to the new water station as both a cold-weather treat and a training device.
Longer-Lasting Lake Effect: Use Large, Deep Containers Filled With Warm Water
In cold weather, I give my chickens warm water. I do this because they love it, and because I discovered that it actually buys me time in bitter cold before I have to bring out fresh water again. Here’s why.
When I use large buckets filled with warm water, the water at the surface actually freezes a bit faster than when I use cool water. This is something called the Mpemba effect. And it’s the reason why you can make ice cubes faster if you fill your tray with warm rather than cold water. However, once that surface-layer freezing occurs, that ice layer actually insulates the water underneath, keeping it from freezing. The ice layer will become thicker over time, but it will happen at a much slower rate than if you had the same volume of water in a shallower container.
With their powerful beaks, my chickens will then just break through the ice as needed to get to the fresh water below. Frankly, my chickens love breaking the ice, so this adds a bit of bonus entertainment for them in less-than-pleasant weather conditions.
Even during a string of single-digit days, this little trick meant I only needed to water once in the morning when I let my chickens out and once again in the afternoon when they were doing their heavy pre-roost eating.
Overnight, in cold weather, I remove access to food in the coop and do not try to offer water again until morning.
Keep in mind that chickens are not designed to be water animals. So make sure whatever container you give them can be easily accessed from the ground and does not create a risk for drowning.
If you are a really hard-core off-gridder and have the space, then you may just want to let nature do the work for you with our next suggestion.
The Drip Effect: Offer Constant Drip Water Sources
We have a spring-fed pond that always has at least one section that continues to flow even in our coldest weather. If it does start to ice up around the flow point, I’ll just break that area up with a shovel and keep it flowing longer.
Even if you don’t have a spring-fed water source, you can use this idea to keep water flowing in your coop. By using a bit of grit, you can jam up a nipple feeder to keep it dripping. Make sure to put some kind of collection receptacle below it to collect the constant flow so you don’t get ice patches in your coop.
Similarly, if you set up your watering system with ball valves, you can create a small wedge with a pebble in your valve suction so that the water keeps flowing in. This is like what happens when your toilet handle is breaking and the toilet keeps on running after you flush. If chickens don’t keep up with the flow, then you may need to set your water bucket or bowl in an overflow box full of absorbent material like wood shavings or sawdust.
In both of these scenarios, water will be constantly dripping, so you will need to keep a close eye on it to make sure your watering system doesn’t run out of water or overflow your collection areas.
The Underground Winter Coop
Now, this idea is speculative. I haven’t tried it. But, since we all know a well-built root cellar will keep liquids from freezing, adding an underground component to your coop should also work great to give chickens a suitably warm location for year-round water.
Keep in mind that a cellar will only work if you dig it well below your frost line. So make sure you find out the cellar specifications for your area before you build. Also, you need to take special precautions in your design to avoid potential flooding in your wet season or structural failure over time.
Now, a chicken cellar is probably only worth considering in extreme cold, or if you have a lot of time and are looking for a fun project to tackle.
Here’s one more idea that takes a bit of work, but also gives you great compost in the end.
Watering Chickens the Jean Pain Way
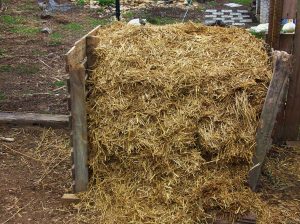
A Jean Pain Mound is basically a giant compost pile of wood chips with a heat-safe coil of tubing buried inside. (The method also calls for a methane digester—but that’s not necessary for chicken watering.) When the compost heats up, cold water is drawn through the coil and forced up through the pile where it comes out hot on the other side. This is called a thermal siphon.
Now, Jean Pain used this method with a really large pile to heat his whole house and also to trap methane gas. But you can also use this concept with smaller piles—like, say, your standard 4′ x 4′ compost pile.
During the winter, when I am giving my goats extra bedding materials and hay rations, I clean their barn thoroughly every 3-4 weeks. That gives me enough material to build a 4′ x 4′ compost pile in just a day. Since the chickens love to hang out on this pile anyhow, I discovered that I could make a divot in the center of the pile after it starts composting, insert a bucket, and keep water from freezing for several days. As the pile shrinks, I top it off, dig a new divot, and insert my bucket.
If you wanted to take this idea up a notch, you could install a thermal siphon that feeds into a bucket from a storage receptacle using a ball valve. The water may come out too hot to drink direct from the siphon, but thanks to Mpemba effect, it will also cool rapidly.
If you are really clever, you could even go further and create a repeating loop with a watering nipple system by harnessing the natural heating and cooling cycles of the water in relation to the thermal siphon. You’d just need to make sure to place your nipples at a point in your loop where the water is cooled enough to drink.
Check out this tutorial from Cornell University to get a basic idea of how to use compost piles to harness heat. Then you’ll be ready to start designing your own creative methods for turning that information into a winter water supply for your coop!
There are literally hundreds of ways to supply your chickens with warm water, even in freezing conditions. I’ve just covered a few to get your creative juices flowing.
How do you keep your chickens’ water from freezing in cold weather? Share your ideas in the comments section below!

_________________________
The Grow Network is a participant in the Amazon Services LLC Associates Program, an affiliate program designed to provide a means for our team to earn fees for recommending our favorite products! We may earn a small commission, at no additional cost to you, should you purchase an item after clicking one of our links. Thanks for supporting TGN!
_________________________
(This is an updated version of an article that was originally published on March 16, 2018.)

Tasha Greer is a regular contributor to The Grow Network and has cowritten several e-books with Marjory Wildcraft. The author of “Grow Your Own Spices” (December 2020), she also blogs for MorningChores.com and Mother Earth News. For more tips on homesteading and herb and spice gardening, follow Tasha at Simplestead.com.


COMMENTS(8)
Wow Tasha, another great post! I had no idea of the “mpemba” effect. How in the heck is that prounced? “mmm-pem-bah”?
I guess that is why lakes freeze on top, but not below, huh?
Hey, that post on “Compost Power” from Cornell is also super interesting. I’ll be contacting Gordon (the author) to see if he will make us a presentation for our next Home Grown Food Summit, or possibly for a TGN DIY webinar.
Thanks so much for sharing!
Marjory – To be honest, I’ve never tried to say the word “mpemba” outloud! It’s actually the last name of the scientist who discovered this principle though. And you are exactly right, this is part of why lake surfaces freeze on top but not below. I think a session on compost power would be an awesome idea for a summit or TGN webinar. You should google Jean Pain Mound too. There are lots of awesome videos showing how he heated his house with a compost heap. Thanks for reading!
Good reading and full of information. However seems off on the subject of salt water. Salt water freezes at a lower temperature. Maybe the specific heat is greater so a bottle of salt water in the clean drinking water would help prevent freezing.
I got an electric heated dog bowl. Then put saturated salt water in the bottom and another bowl with the clean drinking water floating on the salt water.
I found also that feeding mash ie wet food all year long worked well. In even the most extreme cold feeding twice a day reduced the chickens’ drinking water requirement to almost zero.
After 20 years of laying hens a fisher killed half of them early January so now the remainder are at a neighbor’s chicken house with better chicken wire protection.
Hey Gilbert – you’re right. I maybe could have explained that one a bit more clearly. Saltwater freezes at about 28.4 F. So, by submerging the saltwater bottle in the fresh water it gives you a bit of a thermocline inside your water container. The tension between the salt water bottle and the fresh water also create a bit of movement that also works to keep the fresh water from freezing for longer as well. Thank you for clarifying that!
I feed my pigs wet food in cold weather to help keep them hydrated so I think that’s definitely a great idea for keeping chickens hydrated in extreme cold too.
I am sorry about your chickens. I lost about 16 ducks to a weasel last summer so I know how devastating it feels to have big losses like that. I am glad you found a good home for the survivors.
Thanks for your suggestion on feeding chickens mash!
Gilbert, thank you so much for the comment regarding saltwater freezing at a lower temperature than fresh water. We have updated the post to eliminate any confusion on this topic! Have a great day, and thanks again! Merin
Wow great article. Sure wish I had read this about 20 years ago! We did do a coop for our ducks that was underground. We went down 4 feet and put a insulated roof on. Their water never froze and I have to wonder why we never tried doing the chickens this way!
I have an electric watering bowl plugged into the coop, but it’s outside in sunlight. It is easy to reach for morning cleaning with a straw brush that hangs nearby. I bring a gallon jug of fresh warmish water from the house every morning to refill for the day. This seems to be plenty of water for 13 chickens. And super easy.
I too use a heated dog water bowl. When it’s colder than 20 below, I put a big rock I heat in the oven in the water to extend that heat. I use this for animals that are sheltered because they
are young or sick.