Welcome to Post No. 3 in the “Organic Growers’ Tool Kit” blog series!
In case you missed the previous posts in this series, here is the link:
Read More: The Organic Growers’ Tool Kit Series
In our last post we took a close look at soil texture type and how to identify it using our Organic Growers’ Tool #2, the Mason Jar Test. Then, we talked about how to use that information to plan your garden.
Unless you are one of those lucky few with loam soil, you probably found out from that test that you are going to have to do a little work to simulate loam-like soil to grow a healthy, productive garden.
Don’t be discouraged! Building soil is an inspiring process that helps you become grounded (literally) in your environment.
That being said, let’s be real. Most of us want high-quality homegrown food now! Our next tool will help you do that, if you use it wisely.
SCARY DISCLAIMER ALERT! The Organic Growers’ Tool #3 May Make You Want to Use the “F-Word”
This next tool in our Organic Growers’ Tool Kit can help you get great results growing food right now. However, I want to be super clear in advance: Some of the recommendations that result from using tool #3 will encourage the use of materials that aren’t entirely sustainable and are only beneficial to your soil in the short-term.
In particular, this tool may lead you to use the “f-word.”
No . . . not that one!
I’m talking about FERTILIZER.
I know for some who grow food at home, fertilizer is a dirty word that only industrial growers use. But there’s a really important reason why you should consider it, along with a few other not-so-sustainable soil inputs, as you start your garden.
Here’s why:
Weak plants invite pests and pathogens to invade your garden. Once those bad guys infiltrate, it gets harder to control them in the long-term. Healthy plants have the ability to keep pest populations at bay and have better natural resistance to pathogens.
If you skimp on plant health now, you’ll spend more time hand-picking pests. That will make you more likely to use other organic products like neem, insecticidal soap, and diatomaceous earth to treat pest problems.
Those products also “treat” beneficial insects like they are not welcome in your garden. That will add up to even more time and money managing pest problems and can lead to pollination problems.
With unhealthy plants, you’ll likely also end up having to use the other f-word—as in “fungicides.” That f-word, in my opinion, is way worse than fertilizer! Fungicides attack bad fungi, but also the good ones that convert organic matter into natural fertilizer so you don’t have to keep adding it in the long run.
Applying some organic fertilizers and soil conditioning products now can give you a better chance of building truly healthy soil over time. Plus, it helps you grow healthy food with less stress right now.
Now, without further adieu:
Organic Tool #3: The At-Home Soil Test Kit
With an at-home soil test kit, which costs less than $15, you can determine the condition of your soil before you plant. In particular, you can determine your soil pH and whether the amounts of nitrogen, phosphorous, and potassium are sufficient for growing food.
Using the results from your tests, you can make temporary amendments to your soil and plan your plantings to maximize the health and production of your garden in the short term.
What to Look For in an At-Home Soil Test Kit
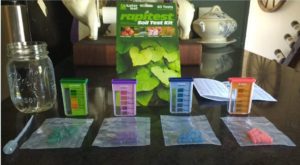
There are several brands of at-home soil test kits. My personal favorite for ease of use, consistency of results, and easy-order refill supplies is the Rapitest Soil Test Kit from Luster Leaf.
However, any reputable test kit that covers pH, nitrogen, phosphorous, and potassium (also called potash) will work.
Each manufacturer provides specific instructions for how to use its test supplies for best results. I recommend you follow those directions in detail. However, I’ll include brief instructions in the sections below to give you an idea of what to expect.
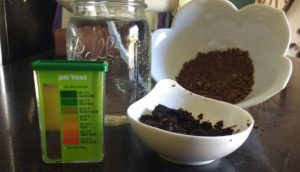
Soil pH Test
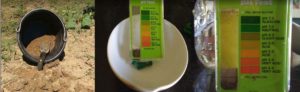
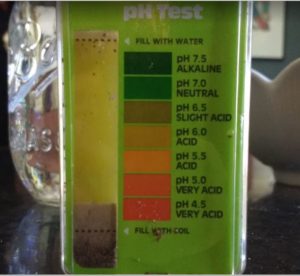
The soil pH test is the easiest to perform. You dig and mix up the top few inches of soil from your garden. Then you deposit a tiny bit of that soil mix in the test container, add the pH indicator powder, top with water, and shake.
Within a minute or so, you’ll know your soil pH.
Why Does Soil pH Matter?
Soil pH is critically important to plant health because it determines if a plant will be able to grow the necessary root systems to uptake the mineral content needed to thrive.
Putting a plant in soil with the wrong pH is like trying to drink water from a cup of mud. Yes, there’s water in there, but it’s really hard to get. Eventually you will die of dehydration if that’s all you have to drink.
This is exactly what happens to plants in the wrong pH. Even if all the minerals they need to grow are present in your garden, plants that don’t have the right pH simply can’t get enough of them out of the soil.
Without the right pH, plants will either die of malnutrition or be decimated by pests and pathogens.
How to Use Your Soil pH to Plan Your Garden
Once you know your soil pH, you need to determine if that pH matches up to the needs of the plants you want to include in your garden.
Your test kit probably comes with a list of plants and their pH ranges. The Harvest to Table website also has a well-organized list that I like to use:
Read More: “Vegetable Crop Soil pH Tolerances” (Harvest to Table)
If your pH does not match your list of vegetables, you have two options for good food production.
Option #1: Choose Plants That Match Your pH
Your first option is to modify your list to choose plants that will produce well in the pH you currently have. For example, if your soil pH is 5.5 and you hoped to grow cabbage with pH needs of 6.0-7.5, that might be a stretch.
Your cabbage heads, if you get any, will likely be the size of brussels sprouts. Turnips and cauliflower, however, will tolerate a pH of 5.5 just fine.
Option #2: Change Your pH Before Planting
If option #1 isn’t right for you, then you need to change your soil pH before you plant. There are a couple of ways to do this.
1. Use Lime or Sulfur
To raise the pH or make soil more alkaline, you can use lime. To lower the pH or make soil more acidic, you can use sulfur.
You can buy these amendments at garden, farm, or hardware supply stores. Your soil test kit will include recommendations for products to use and application rates to help you adjust your soil pH. Alternatively, the bag of lime or sulfur will give instructions for application rates as well.
Depending on how soon you will plant, you need to choose fast-acting or slow-release sources of these amendments. Ideally, applying a slow-acting amendment in fall so that you can plant in spring is best.
If you must plant right away, then use fast-acting formulas. However, make sure to follow the instructions, and apply very carefully to avoid over-correcting your soil pH.
These amendments are typically cheap, which makes them good options if you are on a budget.
2. Apply Compost
Alternatively, you can refer back to our Organic Growers’ Tool #1—organic matter—and add compost to your garden before planting. Finished compost generally has a pH of around 6.5, which also happens to be the range around which most vegetables like to grow.
Don’t take my word for it, though! Use your soil test kit to double-check the pH on your compost source. If it’s not in the range that you need, then pick a different compost source or revert back to using lime or sulfur.
To use compost to change your soil pH and grow vegetables immediately, you’ll need to add a lot. Your soil test probably told you to dig about 3-4 inches into the ground to get the soil for your pH test. That’s because plants will need at least that depth of soil in the right pH range to set strong roots.
Incidentally, adding 3-4 inches of compost on top of your beds is also roughly the amount you’ll need to trick your plants into believing your soil pH is 6.5.
Adding compost to adjust your pH is only a temporary fix. This compost will eventually be worked into your soil by all your soil inhabitants and begin to change your soil texture. You will probably have to add compost at least once a year for several years to make lasting alterations to your pH.
With annual use of compost, your soil will move closer to that pH range permanently. It will also move closer to being loam. Then you won’t need to work so hard to maintain your soil pH. Even when you have a stable pH and loamy soil, you’ll still need to think about N-P-K and other minerals.
On that note, let’s take a closer look at how to test for N-P-K using an at-home soil test kit.
Nitrogen (N), Phosphorous (P), Potassium (K) Soil Test
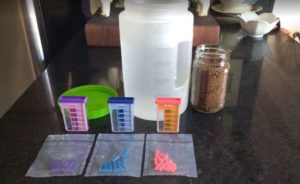
The soil tests for nitrogen, phosphorous, and potassium require taking a soil sample and mixing it with water. The process is similar to Organic Growers’ Tool #2, the mason jar test. The main difference is that the ratio of water to soil may vary depending on your test kit. The Rapitest kit requires 1 part soil to 5 parts water.
After thoroughly mixing the water and soil, allow the soil to settle. Depending on your soil texture type, it can take half an hour to 24 hours for the soil to fully settle so that you can begin the test.
When your soil has settled, extract the liquid from your mix, put it in your test chamber, add the appropriate test powder, and shake. It takes up to 10 minutes for the color to develop and indicate your N-P-K ratings.
When to Take a Soil Sample for N-P-K
Performing the N-P-K test is simple. However, deciding when to do it is the tricky part.
The fact that we test the liquid and not the soil itself tells us something important about how plants use N-P-K. For plants to uptake these nutrients, they must be water soluble. Not all forms of N-P-K are immediately water soluble.
If you apply a slow-release fertilizer and test immediately, you will probably get a much lower reading than you will a few weeks later once the pellets have begun to release nutrients. Also, if you use nitrogen-fixing cover crops, it can take several weeks (or longer if your ground freezes) for the stored nitrogen in the root nodes to become measurable in an at-home test.
The Rule of (Green) Thumb on When to Test
Ideally, you want to test your soil before you make any amendments for best results. Then, you can figure out exactly what kind of amendments your soil needs and apply appropriately.
The Compost Exception
Personally, I like to test my soil before I add compost and then again after. This practice gives me a lot of information about the content of my compost and its impact on my soil. As an organic gardener who relies mostly on organic matter to provide my soil with nutrients, studying the impacts of compost has really helped me develop my soil-building skills.
Using your N-P-K Results
Now that you have your N-P-K results, the next step is to figure out how to safely amend your soil to get the best results from your plants.
Your soil test kit will also have some recommendations on that. For example, if you’re growing root vegetables in nitrogen-deficient soil, the Rapitest kit suggests adding about 14 ounces of “16% nitrate of soda” for every 100 square feet of bed space.
Nitrate of soda is a really fast-acting nitrogen-only fertilizer. As soon as it comes into contact with water, plants can draw up that nitrogen. You can even buy organic nitrate of soda, which may contain a little potassium but is otherwise very similar to nitrate of soda that is not rated for organic use. This stuff is also cheap, which is why it’s a favorite go-to fertilizer for many.
Unfortunately, in areas with heavy rain or in soils with little organic matter, it is hard to hold this nitrogen at the root level where plants need it. Because they are so water-soluble, many fast-acting nitrogen fertilizers end up washing out of soil and into waterways. Excess nitrogen runoff in delicate ecosystems can have huge negative impacts, like the toxic algae blooms that keep closing Florida beaches.
Now, a little bit of runoff from fast-acting fertilizer may not seem like a big deal. However, when it washes off lawns, farm fields, lots of homegrown food plots, and more, then it adds up quickly. And frankly, there are other ways to add fertility in your garden that are slower-acting and safer for your soil life in the long-term.
Even though I love at-home soil test kits and rate them my #3 tool for organic growing, please don’t go using the “f-word” in your garden until you read the next installment in this series. In that post, I cover our Organic Growers’ Tool #4: fertilizers for organic gardens.
Also, you probably already know that it takes a lot more than N-P-K to grow healthy plants. So, we dig deeper into all those “micronutrients” later in this series.
Read More Articles in This Series: The Organic Growers’ Tool Kit Series
What Do You Think?
Please share your soil results and any insights you’ve gained from the soil-testing process using the comments section below. Also, if you have a favorite at-home soil test kit, let us know!
__________________________
The Grow Network is a participant in the Amazon Services LLC Associates Program, an affiliate program designed to provide a means for our team to earn fees for recommending our favorite products! We may earn a small commission, at no additional cost to you, should you purchase an item after clicking one of our links. Thanks for supporting TGN!

Tasha Greer is a regular contributor to The Grow Network and has cowritten several e-books with Marjory Wildcraft. The author of “Grow Your Own Spices” (December 2020), she also blogs for MorningChores.com and Mother Earth News. For more tips on homesteading and herb and spice gardening, follow Tasha at Simplestead.com.


COMMENTS(11)
Lots of good info. Thank you for sharing.
Peppypoblano – You’ve been reading everything! You must be gearing up to grow some awesome stuff in your garden! Thanks for feedback! Tasha
Great article with a lot of information and easy guidelines.
Thanks for reading! Hope you enjoy the rest of the series too!
Great information. Now to put it into practice as fall is upon us here in South central Pa.
I’ve got the same brand. But I have to get my wife or son to look at these for me. My color vision is a little subpar in some of these hues.
Looking forward to reading about the micronutrients!
Great article, Tasha. I’ll have to read the others in the series as well. I have one of those test kits sitting in my garden shed for almost two years – I should really break it out and start using it.
That is an interesting observation about compost and how it is the perfect pH but that it takes a lot of compost to permanently change the pH of a garden bed. I’m trying as I can to generate more and more compost every year, but hard to do in an urban garden. I only have so much room to compost and so much material to add.
Marc – Sorry for the late reply. We had some relatives visiting and I think I may have missed a few notifications while I was showing them around our area.
We’re trying to be mostly food self-sufficient, so I generate a lot of compost. But even I have to bring in some outside materials sometimes. I try to find free sources when I can. For example, our nearest city, Winston-Salem, makes leaf compost available to the public once a year. Many of the vineyards in our area compost their grape skins and seeds and are happy to share. Also, some cattle farmers around here are happy to have people haul off their manure for free so they don’t have to deal with it.
Also, when I used to live in the suburbs, I made it a habit to pick up a few bags of compost each week as part of my grocery shopping routine. I found that to be a lot easier than trying to deal with a whole bunch at once.
It’s good to be self-sufficient, but there are a lot of wasted resources out there. So I don’t think there’s any shame in helping other people put their waste to good use in your garden!
Thanks for reading and good luck with increasing your compost creation capacity!
Tasha
I have never done a soil test. I have always amendended my soil whether doing a till or no till garden., gardening in multiple locatiosn. So this is interesting information!
Grammyprepper – You might be one of those rare people with a knack for knowing soil! I have a pretty good sense now, but I still rely on soil tests when I run into new problems.
This year we had insane rain – like 6 inches in a couple hours kind of rain. Despite all the organic matter in our soil, so many nutrients were leached out at different rates that I found soil tests to be incredibly helpful in getting all my beds back on track quickly.
Even if you don’t need them all the time, soil tests can be really helpful.
Thanks for reading!
Tasha
Hi Tasha,
Do you have any recommendations for the best place to have my soil tested for pesticide/chemical ie: glyphosate content? My garden is close to the farmers field, I would like to know how much chemical overflow I am getting.
Thanks,
Kim