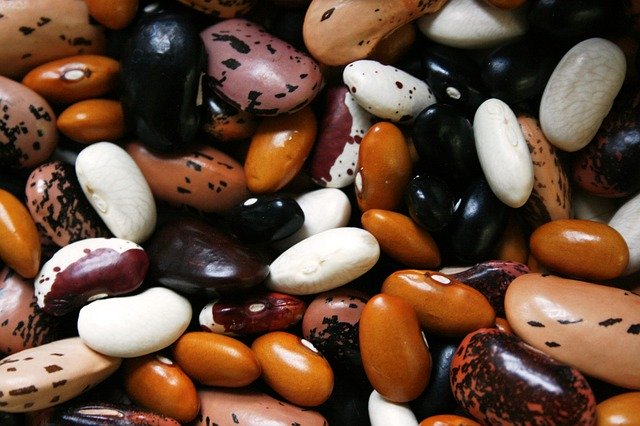
So you have 50 pounds of dried beans in your food storage, and it’s time to rotate them! What in the world are you going to do with 50 pounds of beans? Thankfully, all is not lost! You do have a few options.
You can:
- Grind them and make bean flour
- Pressure can them for ready-made meals
- Sprout them
- Supplement your chicken’s feed
#1. Make Bean Flour
Let’s talk about making bean flour first.
You will get approximately 4 cups of flour for each pound of beans ground.
You can replace about 1/4 to 1/2 of the wheat flour in most recipes with bean flour. The best beans for making into bean flour are the white beans—such as navy, small white, or great northern—due to their mild flavor and color, but any bean can be made into flour.
Black beans and kidney beans have a much heartier flavor and will go well with baked goods containing chocolate, such as brownies.
They can also be used to add color and depth to breads, while pumping up the nutritional value. Beans, when paired with grain (especially corn) make a complete protein that is only available to your body when consumed together. This is truly a case of 1+1=3!
How to Make Bean Flour
To turn your beans into flour, you will first want to sort through them, removing any rocks or other foreign objects. Since you will be grinding the whole bean and putting them straight into your food, it would be a good idea to wash them thoroughly. Then lay them out on a towel and pat dry, allowing them to air dry until reasonably dry.
Next, toss them into your grain mill using your bean auger or your regular grain auger set at a looser setting, and grind away. You will probably have to send them through 2 or more times, “cracking” them the first go-round and grinding smaller each successive time until the grind is to your liking. My Country Living Grain Mill took 1 pass to crack and 1 pass to grind using my regular wheat auger.
Recipe: Corn Bread With Pinto Bean Flour
Try this corn bread recipe using pinto bean flour. I think you will like it!
1 c. hot milk
1 c. cornmeal
1/2 c. flour
1/2 c. pinto bean flour (or try another bean)
2 Tbsp. honey or sugar
2 Tbsp. vegetable oil
1 egg
1 tsp. salt
3 tsp. baking powder
Mix the cornmeal and bean flour together in a bowl. Stir in the hot milk and mix well. Mix in the egg. Add in the remaining ingredients and stir just until moist. Pour into a greased 9×9 pan or a medium cast iron frying pan that has been preheated and greased. Bake at 400°F for about 20 minutes.
Recipe: Instant Refriend Beans
Bean flour can also be used to make refried beans. This makes a pretty thick mixture, so add a little more water if you like them thinner.
2 c. water
3/4 c. bean flour (pinto, black, etc.)
1 Tbsp. vegetable oil, bacon grease, or other oil
Salt and pepper to taste
In a saucepan, bring water and oil to a boil. Stir in bean flour. Reduce heat to very low and let simmer for about 5 minutes, stirring often. Add salt, pepper, or other spices to taste.
This may be used in burritos, nachos, dips, or any other way you would use a can of refried beans.
Bean flours may be whisked into soups and stews to thicken them.
White bean flour can be used in making your own “cream of” soups.
Recipe: Cream of Chicken Soup Using Bean Flour
2 c. broth (chicken, vegetable, or beef)
1/3 c. white bean flour
Put the broth in a saucepan and add in bean flour, mixing with a whisk. Simmer on low until thickened.
This makes about the same as 2 small cans of cream soup and can be used in recipes the same way.
Here are a couple of recipes found on Bobsredmill.com for black bean dip and black bean tortillas.
Recipe: Black Bean Dip
Makes 3 cups
1/2 c. salsa
2-1/2 c. hot water
1/2 tsp. sea salt
1/2 tsp. chili powder
1/4 tsp. cumin
3/4 c. black bean flour
Whisk 3/4 cup of Bob’s Red Mill Black Bean Flour mixed with 1/4 tsp. cumin, 1/2 tsp. chili powder, and 1/2 tsp. salt into 2-1/2 cups of hot water. Stir 1 minute while cooking over medium-high heat. Reduce heat to medium-low, cover saucepan, and cook an additional 4 minutes, stirring occasionally.
Add 1/2 cup of your favorite salsa or picante sauce and allow mixture to cool. (Let mixture cool for 15 minutes if serving as a dip.) May be topped with grated cheese (if desired) and chopped green onions and cilantro.
Recipe: Black Bean Tortillas
1-1/2 Tbsp. canola oil
3/4 tsp. baking powder
1/2 c. unbleached all-purpose white flour
1/4 tsp. sea salt
1/2 c. water
1/2 c. black bean flour
Mix together the black bean flour, white flour, baking powder, salt, water and oil in a medium size bowl. Turn out onto a lightly floured work surface and knead about 5 minutes, until elastic, add more water if needed. Let dough rest 15 minutes, divide dough into 6 equal portions and roll into balls. On a lightly floured surface, roll balls out until very thin and round.
Preheat a 10″ or 12″ nonstick skillet until hot. (Do not use any oil.)
Place tortilla round in skillet and cook each tortilla one at a time until golden brown on each side.
#2. Pressure Can for Ready-to-Eat Beans
Having beans ready to go, straight from your shelf is a great thing. Old beans tend to take a very long time to cook, but the high heat of pressure canning makes them very tender in a short time.
To can beans, first sort and rinse as usual. Then cover with water and either soak overnight, or bring to a boil, remove from heat, cover, and let stand for 1 hour.
Fill clean canning jars half full of soaked beans for juicy beans, or 2/3 full for beans you will mash or add to other recipes.
Add 1/2 tsp. salt to pint jars, and 1 tsp. salt to quart jars, if desired.
Fill the remaining space in the jars (leaving 1 inch headspace) with either the bean-soaking water, freshly boiled water, tomato juice, or a combination of those.
Remove air bubbles. Wipe rim of jar clean; place hot, previously-simmered lid on jar; and screw down firmly tight.
Process pints for 75 minutes and quarts for 90 minutes at 10 pounds pressure in a pressure canner.
#3. Grow Bean Sprouts
Sprouting is an excellent way to bump up the nutrition of your beans and eliminate the gas-producing nature of beans. It also turns your beans into greens! Most of your dried beans may be sprouted. Each will have its own unique taste.
Sprouting time is 2 to 3 days or when the shoot is about 1/2 inch long. 1 c. of beans will yield 4 c. of sprouts. Optimum temperature to sprout is 68–80°F.
Bean sprouts may be ground and added to meat patties or loaves, or tossed into soups, casseroles, chili, or any other recipe where beans would be used.
They may also be steamed until tender, chilled, and added to salads, or lightly stir-fried and tossed with a little butter or olive oil while still warm.
However you choose to use them, they should be washed thoroughly under running water before use. Some say they should not be eaten raw, but should be cooked using one of the methods mentioned above, as the simple act of sprouting can harbor bacteria that will be killed when heated.
To sprout beans:
- Sort beans and remove any broken or otherwise damaged ones. These will tend to ferment.
- Wash beans well and place about 1/4 cup into a quart canning jar.
- Cover with about 2 cups of warm water and allow them to soak for at least 12 hours. A few more hours for older beans would be fine.
- Drain the beans and rinse well, draining again.
- Cover the mouth of the jar with cheesecloth or nylon netting. Secure with a rubber band around the neck or with a canning screw band.
- Place your jar of beans upside down, slightly tilted, into a bowl. This will ensure airflow while helping any extra water to drain away.
- Place your jar in a warm, dark place, or cover with a towel.
- Rinse, drain, and return to the dark place 3–4 times a day, allowing your sprouts to soak in the water for about 5 minutes on the final rinse each evening.
- When the sprouts have reached the desired length, set the jar on the counter to absorb the light for a few hours. This will enable the leaves on your sprouts to green up.
- Use immediately, or refrigerate and use within a couple of days.
#4. Supplement Your Chicken’s Feed
Your chickens would really appreciate some of these bean sprouts, too! They are very high in protein and would be an excellent supplement in winter when there aren’t many bugs to meet their needs. Egg production and feather production (molting) require protein. Feeding a handful or two (about a half to a full cup) of sprouted beans to about a dozen hens or so each day or several times a week could make a real difference in your hens’ ability to stay warm and healthy during the winter.
So, give some of these ideas a try. You may find yourself buying “extra” beans just for this purpose!
What Do You Think?
What’s your favorite way to use up dried beans? Let us know in the comments below!
__________________
(This is an updated version of an article that was originally published on November 10, 2014. The author may not currently be available to respond to comments, however we encourage our Community members to chime in to share their experiences and answer questions!)


COMMENTS(17)
This was GREAT!!!!!!!!!!!!! The best thing I have read in a long time. THANK YOU! Kay
Never would have thought of Bean Flour. I’ll have to get a grain mill. loved the article.
This was a great article! Had to leave a comment so I could rate it.
This was a very good article. Thank you for the information.
This was a great help!
Too bad the authors did not give credit to “Country Beans” Cookbook author Rita Bingham for her “inspiration” for this article.
I would be wary of simply grinding beans into flour without cooking them first; you can get very sick.
Please do your research first before proceeding.
I bet their are more ways to use up your beans. I like what I read and the recipes are great. I copied them and put them in my cookbook. If you can’t use up all of those beans, still don’t them away. If you have a Biogas Processor, It would be a great to add it to the tank to make the Biogas.
I love that you grow your food and than what a great way to cook the beans, I would use these ideas. Great easy recipe.
Uncooked red kidney beans contain very large amounts of the toxin phytohaemagglutinin. They MUST be cooked before ingesting or else will cause severe vomiting, cramping, and diarrhea. The intense symptoms could cause other sequela in certain individuals. I do not know if chickens are sensitive to this toxin the way humans are; to be safe, always thoroughly cook red kidney beans before grinding into flour, paste, or feeding them to anyone.
Thanks Roz.
This was a great article. When my kids gave me a mill for Christmas, I made bean flour but didn’t have a clue what to do with it. Now the possibilities are endless! Love the refried bean recipe. Thanks for always opening new avenues of thought!
I can relate to this one and look forward to trying some of these out.
Thanks,
Great article with fantistic recipes with the use of beans. Can’t wait to try some out. You can only eat so many beans. Love the flour idea and all the uses. Very infomative:) I rate this article a 10. Thanks again
Loved this article! Beans are in my emergency store but I don’t really want to eat them unless there is nothing else because we tend to eat Paleo so feeding bean sprouts to the chickens is a fantastic idea. You can also make your own dog food by cooking beans and rice and mixing them. I rate this article 5 stars!
Marjory, You really should put a warning in the body of the article (or at the top of the article) warning about eating uncooked kidney beans–red are the worst, iiuc, but, iiuc, white kidney beans, aka canneloni (SP?) also contain large amounts of the toxin. Further, cooking kidney beans at too low a temperature (I would boil for 10 minutes for safety) actually increases the toxin, up to 5 times the amount before cooking.
One thing I am curious about (and haven’t seen an answer) is the effect of sprouting the beans.
PS: The warnings I’ve seen mention red kidney beans as the most toxic commonly used bean in the US–clearly implying (well, even stating) that some beans more common in other countries are just as toxic.
I guess you may pooh-pooh the issue as the toxin does not (usually??) kill someone, but it makes them pretty uncomfortable, and there may be more serious issues. (Children fed with too many beans with low doses of the toxin sometimes have both physical and mental developmental issues. All or most beans have the toxin, in most cases it is too low to cause acute symptoms.)
Oh, you can look it up, the name of the toxin starts with hae, and it does something like bind proteins to the stomach lining…
Consider this: In hard times messing with building and maintaining a fire is time consuming and tiring when you consider all the other things need tended to if one is having to eat by means of camping…so, to cook beans is a long process UNLESS, you do the work while you still have a power grid, and then with a lot less effort, your fire only needs to last a couple of minutes in stead of 3 or so hours…just boil water and add the bean flour to the water and not only do you have the wonderful bean dip, but the goodness of the beans as well, not to mention food vs starvation…Great info thanks so much for posting!