Growing microgreens is usually straightforward, but as with any gardening, you might encounter a few hiccups. Below are some common microgreen growing problems small-scale growers face and how to address them. Don’t be discouraged if you run into one of these issues – with a few adjustments, you’ll be back on track in no time.
Troubleshooting the most Common Microgreen Growing Problems
Mold or Fungus Growth
What it looks like
You might see white, fluffy mold growing on the soil surface or around the stems, usually accompanied by a musty smell. It often appears when conditions are too damp and stagnant.
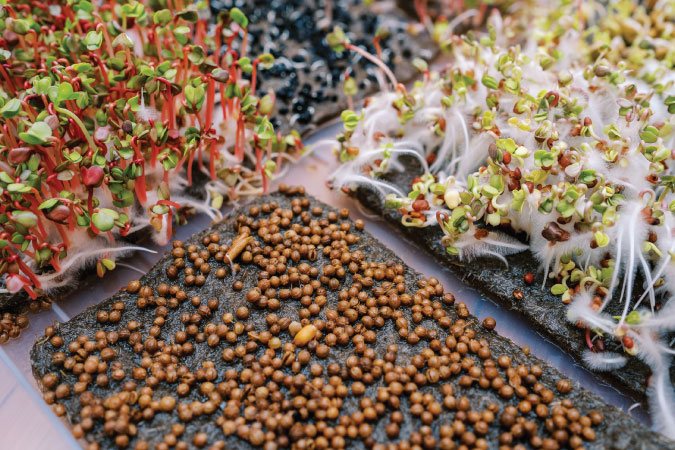
It’s important not to confuse mold with the delicate white root hairs that some microgreens (radish, broccoli) naturally produce near the roots—those look like white fuzz. Below is an example of root hairs.
These tiny root hairs are part of the plant and usually appear uniformly along the root, especially when the medium is dry. Mold, on the other hand, tends to form patches on the soil or in densely seeded areas and can be greyer and more web-like.) True mold will spread if unchecked and can kill or make your seedlings rot.
Causes: Excess moisture and poor airflow. Overwatering, especially from the top, or leaving a humidity dome on for too long can create a mold-friendly environment.
High temperatures (above ~75°F) also encourage fungal growth.
Overseeding to the point of extreme crowding can reduce airflow around stems and trap moisture, encouraging mold. Using unsterilized garden soil could introduce mold spores, though most spores are ambient anyway.
Prevention and Solutions
The best cure is prevention:
- Air circulation: As emphasized, remove covers as soon as possible and use a fan if needed. Even briefly fanning the trays by hand daily can help.
- Water properly: Water from the bottom once seeds have sprouted to keep the surface dryer. If you must top water, do it early in the day so moisture evaporates. Never let the medium become swampy.
- Temperature control: Keep the growing area in the recommended range (65–75°F). If it’s hot, you must compensate with more airflow.
- Cleanliness: Wash trays between uses. Start with fresh, sterile soil for each crop. Use clean water.
- If you see a small mold patch, act quickly. You can remove that section of seedlings and soil entirely to stop the spread. Improving air circulation immediately often halts it. Some growers lightly mist affected areas with a dilute hydrogen peroxide solution (food-grade 3% H₂O₂ diluted 1:10 with water), which can kill surface mold—but use sparingly and avoid soaking the greens.
- Reduce seeding density slightly on your next round of microgreens if mold is a persistent issue. Overcrowding can contribute to the growth of fungus.
Don’t be too dismayed—mold is one of the most common issues when growing microgreens, but it’s very manageable once you dial in the watering and airflow. Growing microgreens at home has the advantage of allowing you to monitor your trays frequently.
Leggy or Floppy Microgreens
What it looks like
“Leggy” microgreens have abnormally long, thin stems and often fall over instead of standing upright. They may also look pale or yellowish. You might notice they’re much taller than expected and very delicate.
Causes
Insufficient light is the primary cause of leggy microgreens. When sprouts germinate and don’t get enough light intensity, they stretch taller and taller, looking for it. This can happen if you delay uncovering them for too long – they grow in the dark and become spindly (which some people intentionally do for specific varieties, but it is generally not desired.
It also happens if your light source is too weak, too far away, or you’re growing in a dim location. Another cause can be high heat—if temperatures are too warm, they grow too fast and thin. Overcrowding can also cause some stretching as they compete upward for light and space.
Solutions
- Give ample light early: When most seeds sprout, immediately put them under good lighting. Don’t keep them covered in darkness beyond the recommended time. If using window light, ensure it’s a bright window (south or west-facing) or supplement with artificial light, especially on cloudy days.
- Distance and duration: If using a grow light, position it closer to the plants. A weak window light that’s far away will cause stretch; instead, set trays right up to the window glass (being mindful of temperature).
- Provide at least 12 hours of light a day, up to 16 hours for those that need it. If you notice seedlings leaning heavily towards the window, that’s a sign they want more light. You can rotate trays daily for even growth and consider boosting using artificial light.
- Temperature: Ensure it’s not too hot. Growing microgreens at cooler room temps (around 65°F) can produce stockier growth than at 80°F.
- Resow if needed: Unfortunately, once microgreens have gotten very leggy and flopped, they won’t thicken up. You might still salvage them to eat, but it’s a sign to adjust for the next batch. Learning from it, you might sow less densely and light them better. Legginess is usually an easy fix, as it is provided with stronger light immediately after germination in future attempts.
Poor or Uneven Germination
What it looks like
You sowed a thick layer of seeds, but only a portion sprouted. You see bare patches in the tray where seeds didn’t germinate or many seeds taking much longer than others to grow. This results in a thinner yield or tray sections maturing at different times.
Causes
The quality or viability of the seed is a significant factor – old or improperly stored seeds may have low germination rates.
Planting technique can also cause issues: if seeds were not in contact with moist soil (for example, some sitting on a dry clump or not pressed in), they might not germinate well.
Another common cause is not keeping the seeds moist enough in the first few days—if they dry out at any point during germination, many will not sprout.
Lastly, you may need to seed heavier on the next round. Using too few seeds will result in a patchy crop.
Temperature plays a role: if it’s too cold, germination will be slow and uneven; if it is too hot, some seeds may rot. Also, some larger seeds (peas, sunflowers, beets) naturally have more staggered germination unless pre-soaked.
Finally, depth – microgreen seeds should generally be sown on the surface or barely covered. If you buried some (either by accident or they got pushed under too much soil), they might struggle to emerge.
Solutions
- Use fresh, high-germination seeds: Purchase from reputable suppliers and check if the package has a test date. If you suspect your seeds are old, try a quick germination test on a wet paper towel with a few seeds to see how they do. Starting with quality seeds avoids a lot of headaches. Our favorite microgreen seed supplier is True Leaf Market. https://www.pntra.com/t/SUNHSU9ORk9DR05KT0tKQ0dLSUdOSw
- Soak seeds that need it: For peas, sunflowers, chard/beet, nasturtium, etc., soaking 8-12 hours before sowing can greatly improve uniformity by speeding up germination. It softens their seed coat and wakes them up.
- Maintain even moisture during germination: Mist at least once or twice a day to keep the top layer from drying out () (). Using a cover or humidity dome helps here, but remember to remove it immediately.
- Ensure contact: After sowing, press the seeds into the medium so each has contact with something moist (). If you find a lot of seeds still sitting dry on top after a few days, that is likely the issue.
- Temperature sweet spot: Most microgreen seeds germinate best around 70°F. If your space is cold (say below 60°F), consider a seedling heat mat under the tray for the first few days to improve germination. Conversely, move to a slightly cooler spot if you’re germinating on a warm appliance or hot area.
- Even distribution: Try to broadcast seeds as evenly as possible when sowing. Uneven seeding can lead to clumps (where seeds may stay too wet and rot) versus bare spots (where maybe they dried out). Practice will improve your technique – you can divide your seeds into two portions and sow half over the tray at a time, crisscrossing directions to achieve better coverage.
If you get an uneven tray despite all this, you can still harvest what grew. Next time, you might adjust by sowing a bit more densely to account for any no-shows or troubleshoot the seed source.
Yellowing or Wilting Microgreens
What it looks like
Instead of vibrant green, the microgreens look pale or yellow or start to droop even when not that tall. This can happen in patches or overall.
Causes
Lack of light can cause yellowing (plants need light to turn green). If they stayed yellow long after being exposed to light, they likely aren’t getting enough intensity or hours of light.
Another cause is nutrient deficiency, but in the short microgreen lifespan, that isn’t an issue unless you’re growing them longer than 2 weeks (the seed’s nutrients generally suffice for 10-14 days.
If you try to grow a microgreen past its ideal harvest (for example, going into 3-4 weeks), it might yellow as it exhausts the seed energy, and there are no nutrients in a soilless medium—but usually, you’d harvest before that.
Wilting could be from underwatering (they dried out)—microgreens have tiny roots and can flop quickly if thirsty. Conversely, wilting can also occur from rot at the base (damping off) if overwatered and infected.
Solutions
- Increase or improve the lighting for general yellowing. Once true leaves appear, if they look yellowish, some half-strength diluted organic fertilizer can green them up—but most microgreens don’t require fertilization in such a short grow, so this is more for longer-grown shoots. Ensure you’re harvesting at the right time; letting them linger without nutrients can cause a pale color.
- If wilting, check the moisture of your medium. If bone dries, immediately water (bottom water or gentle mist), and they often perk back up if not too far gone. If the medium is wet and stems are collapsing at the base, you might have to damp off (a fungal issue) – in that case, salvage what you can harvest and discard the rest, then review the mold prevention tips for next time. Proper airflow and not overwatering are key to preventing stem rot (damping off).
- Sometimes, microgreens tilt or wilt simply because they outgrew their support—e.g. if they got leggy. In that case, it’s an environmental issue (light/space).
- If you see cotyledons (seed leaves) yellowing while the true leaves are coming in green, that’s normal. The plant transfers energy and doesn’t need those seed leaves much longer.
By troubleshooting in this way—observing your microgreens daily and adjusting—you’ll quickly learn the right balance of water, light, and density.
Every home environment is a bit different, so don’t worry if it takes a batch or two to dial it in. The good thing is that microgreens grow so fast that even if you make mistakes, you can try again almost immediately and apply what you learned.
A Green Thumb in Tiny Spaces
Growing microgreens indoors is rewarding for any homesteader or Gardner. You don’t need a backyard or even a balcony—just indoor space and a DIY spirit. In a matter of days, you can go from seed to salad, snipping flavorful greens on your kitchen counter.
For members of The Grow Network and self-reliance enthusiasts, microgreens offer a high-nutrition crop that complements your homegrown food supply year-round, even when outdoor gardens are out of season.
What’s terrific is how scalable this is. Start with a tiny tray of radish microgreens on a windowsill. Once you taste the difference and see how easy it can be, you might find yourself with an entire shelf of trays under a grow light, producing a diversity of micros each week. They’re that addictive – in a good way!
Microgreens align perfectly with sustainable living: you can reuse supplies, compost the leftovers, and dramatically reduce waste (no more buying plastic clamshells of greens that spoil in the fridge).
Conclusion
As a beginner or intermediate grower, don’t be afraid to experiment. Try new seed varieties, taste your greens at different growth stages, or test growing in soil vs. coco coir. This guide has given you the fundamentals, but feel free to innovate and adapt to what works best in your home. The DIY ethos is strong in microgreen growing – many people devise clever setups with repurposed furniture as growing racks or automated watering for convenience. You might find joy in the harvest and nurturing these little plants.
We hope this comprehensive guide sets you up for success. To recap the essentials: start with good seeds, maintain a clean, moist environment for germination, give plenty of light and air as they grow, and harvest at the right time. With those points in mind, you’re well on your way to producing a continual supply of nutrient-dense microgreens, even in the tiniest homes.
Now, go forth and get growing! Your homemade microgreen salad (or smoothie or sandwich topper) awaits. And as you crunch on those homegrown greens, you can truly savor the fruits (or rather, greens) of your labor – a small but powerful step toward greater self-sufficiency and healthy, homegrown eating.
Read More in this Series:
A Beginner Guide to Growing Microgreens
The Top 5 Easiest to Grow Microgreen Varieties for Beginners
Harvesting and Storing Microgreens
Our Favorite Microgreens Supplier:
