Inside Edition, February 2018: ‘How to Make Your Own Tinctures, Salves, and Oils’
February 2018
How to Make Your Own Tinctures, Salves, and Oils
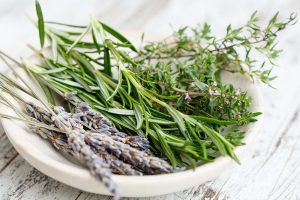
Growing herbs in your summer garden is great, but the window for enjoying them fresh is far too short. What can you do to savor their benefits for longer than the summer season? To extend their shelf life and boost your prowess for herbalism, consider making your own tinctures, salves, and oils this year.
Making homemade botanical products gives you complete autonomy over the plants you use, and controlling (or even growing) the ingredients yourself will also save you money. Best of all, creating your own herbal formulas lets you develop recipes that perfectly match your preferences in ways that mass-produced products never will.

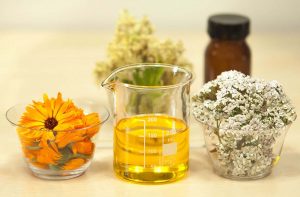
What Are Tinctures, Oils, and Salves?
Tinctures, oils, and salves are three separate ways to preserve and enhance the healing properties of plants. Each uses a different medium for extracting the beneficial compounds from the plant material, and all three produce a product that makes the benefits accessible to your body.
Essential Oils
Essential oils are one of the most popular types of oil used in wellness products today. They are volatile materials derived from plants that contain powerful health properties,1)ScienceDirect: Essential oils used in aromatherapy: A systemic review depending on the type. Their high concentrations of active compounds mean that many essential oils can be toxic when applied directly to your skin unless they are diluted first.
Calling these compounds essential “oils” is a bit of a misnomer, as a more appropriate name might be “super concentrated plant extracts.” Essential oils also tend to evaporate at room temperature, so they are often blended with “true” oils like olive oil.
Tinctures
Tinctures2)Herb Lore: Tinctures – What Are They and How Do You Use Them? are highly concentrated liquid plant extracts that boost both the efficacy and shelf life of your herb collection. They might look like essential oils, but tinctures are made by soaking plant material in alcohol, apple cider vinegar, or even vegetable glycerin for several weeks until the beneficial compounds (called phytochemicals)3)Oregon State University: Phytochemicals infuse into the liquid. Once you strain this plant material out, the resulting liquid is your tincture.
This slow extraction process releases significantly more of the plant’s active compounds than you can ingest from eating them fresh, powdered, or infused into tea. Taking an eye-dropperful (about 30 drops) of homemade tincture under your tongue lets these phytochemicals enter the bloodstream quickly. Some people also prefer to dilute their tinctures with juice or make them into a tea. Depending on the herbs you use, the tincture might start working immediately, or it might take several weeks for the levels to build up in your bloodstream.
Because tinctures can last for five years or more, they are an ideal way to store the potent properties of herbs that would otherwise need to be replaced each year, making them a cost-effective, space-efficient option for the home herbalist.
Salves
Salves are a simple way to treat dry skin and allow potent herbal properties to be absorbed into your body. Salves, balms, and ointments are all names given to herbal extracts that are infused in a semi-solid mixture of oils and waxes. Lotions and creams are a little different than salves because they also contain water.
Depending on the herbs you use, salves can be used to heal wounds, soothe skin irritations, and temper down aches and pains.4)University of Maryland Medical Center: Herbal Remedies While most are solid at room temperature, salves quickly melt when in contact with your skin, making them less messy and easier to apply than standard lotions. For this reason, salves are a great way to start experimenting with home herbalism.
Simple Recipes for Homemade Tinctures, Oils, and Salves
You’ll save a lot of money by learning to make tinctures, oils, and salves, and formulating them yourself makes the wellness-promoting properties easier to personalize. Experimenting with these simple recipes will help you gain confidence as a home herbalist, and the results make great gifts.
Keep in mind that herbal concentrations can be unpredictable. Experimentation is key, as you might need to adjust your ingredient levels a few times before you are happy with the results.
Homemade Essential Oils
Essential oils are having a moment these days, and for good reason! These concentrated plant compounds have profound health properties that make them popular in high-end perfumes and cosmetic products, but it’s easy to break the bank buying them.
A more affordable option is to make homemade oils instead. However, be warned that it takes an enormous amount of plant material to make even an ounce of essential oil, so unless you grow your own, you might still be better off buying your oils premade.
If you don’t have access to a still for steam evaporation, your crockpot can work in a pinch. Use these tips to get started.
- Place at least three to four cups finely chopped plant material in the crockpot, and cover with distilled water. You shouldn’t fill more than three-quarters of the interior volume.
- Put the crockpot lid on upside down so that it is concave.
- Turn the pot on high to heat the water. Once it starts steaming vigorously, turn it down to low and let it simmer for about four hours.
- After the plant material is cooked down, turn off the pot and let it cool. Once cool, place it in the refrigerator for at least 12 hours.
- When you pull the crockpot out, there should be a thin film of hard oil on the top. Quickly and carefully scrape it into a small glass bottle, as this oil will soon melt back into a liquid.
- Store the oil in a colored glass container, keeping it away from light and heat.5)DIY Naturals: DIY Essential Oils
Your homemade essential oils can be used just like store-bought ones, but keep in mind that they might not be as potent, meaning you will need to use more to get the same effects.
Essential Oils vs. Infused Oils?
If homemade essential oil sounds like too much effort, you might be better off making infused oils instead. This involves soaking plant material in oil to extract its medicinal properties. You can use the resulting oil on its own, or use it as a base for homemade salves.
There are many methods for creating homemade oil infusions, including the following:
- Solar Infusion: While most infusions require you to put your herb and oil mixture in a dark space, you can also rely on a warm, sunny window to break the plant compounds down faster. Adding a tablespoon of apple cider vinegar will speed up the process, and you can strain and use your infusion after two weeks.
- Oven Extraction: Ovens allow for quick, hands-off herbal extractions. Place the oil and plant material in a canning jar together, placed upright in a pan with enough water to cover half the jar. Turn the oven to its lowest setting and let it warm up for several hours, monitoring it carefully so that the oil doesn’t overheat and burn.
- Double Boiler: Place your herbs and oil in a double boiler, slowly bringing the mix to a simmer. Stir frequently for up to an hour, ensuring that the oil doesn’t overheat.
After the oil is infused, you can strain the mixture and bring it to room temperature. To add some extra stimulation to the mix, consider adding a few drops of lemon or rosemary essential oil.6)Annie’s Remedies: Herbal Infused Oils
Homemade Tinctures
If you have a sizeable herbal harvest you want to process, creating herbal tinctures is a smart way to make your plants last longer and get the maximum benefit from them.
The first step is selecting a solvent (called a menstruum) to extract the chemical compounds from plant material. Alcohol, glycerin, and vinegar are all options, though technically using anything but alcohol creates an extract, not a tincture.
Alcohol is the most effective because it best extracts fats, waxes, resins, and volatile oils out of the plants. Using an 80 to 100 proof alcohol like vodka or brandy is best because they provide the most beneficial alcohol-to-water ratio.
While fresh or dried herbs can work, you will get the most potency for your tincture by relying on the freshest plant material you can find. The general ratio is about one pint of menstruum to two ounces of dried herbs or two handfuls of fresh.
Making a tincture isn’t an exact science, but rather a trial-and-error process of subtle adjustments as you determine what ratio of ingredients works for you. These steps can be adjusted based on your ingredients and amounts to make a wide variety of tinctures.
- Chop herbs finely.
- Label a glass jar with the herb type and date.
- Add herbs and menstruum, taking care to completely cover the herbs while still leaving some headspace in the jar.
- Cap with a tight lid and place in a room-temperature dark space. (Kitchen cupboards work well.)
- Shake the jar at least once per day. If the menstruum level begins to go down, add more to it.
- After several weeks, strain the contents through cheesecloth until the liquid is pure.
- Allow it to settle overnight before filtering it again through filter paper.
- Store the resulting tincture in a labeled, tinted bottle away from light and heat.7)Annie’s Remedies: Herbal Infused Oils
How long you choose to infuse your tinctures is a personal choice. Traditional Chinese medicine often requires herbs to soak for months or years, but it’s perfectly possible to make a robust blend after just four to six weeks.
To use your tincture, take a dropperful of liquid and place it under your tongue. If you desire, you can add a dropperful to a cup of warm water to make instant tea.8)Herb Lore: Tinctures – What Are They and How Do You Use Them?
Easy Homemade Salve
If your body needs some herbal help from the outside in, creating and using homemade salves is the right idea. While it can take a little practice to get your salve right, your first success will be all it takes to stop you from ever using store-bought lotions again!
Wax is the critical ingredient for making the salve, and the more you add, the firmer the final product. Waxier salves work well for protective products like lip balm, while softer salves are better for penetrating deep into the skin and treating scrapes or rashes.
For a basic salve, you can follow these instructions:
- Make an herbal infusion with olive oil by following the earlier instructions.
- Heat the infused oil with the ratio of beeswax you want until it is fully melted. Generally, body salves are a three-to-one ratio of oil to beeswax, and lip balms are a two-to-one ratio. As you make your batch, you might want to test the viscosity by pouring dabs onto a cold plate to see if more wax is needed.
- Pour the mixture into small containers, let set, and use wherever the skin needs an extra boost of healing benefits.
Want to turn your salve into a balm? Just add several drops of essential oil before it cools down, and you’ll add a pleasing scent and potential wellness properties to your skincare product.9)Mountain Rose Herbals: DIY Salves
Remember: Quality Ingredients Make all the Difference
Herbal remedies are an easy and effective way to take back control of your health and gain a more profound understanding of the health benefits of natural products.
It bears repeating: The key to a successful salve, tincture, or oil infusion rests in using quality ingredients.
Without an ample supply of herbs on hand, you might struggle to keep your creations beneficial and cost-effective. But no worries! A few experiments with herbal remedies may be all the encouragement you need to get started growing your own herbal garden right at home.


References