Check out our mouthwatering DIY sauerkraut recipe for a tangy, crunchy treat teeming with gut-healthy probiotics and bioavailable nutrients.
")
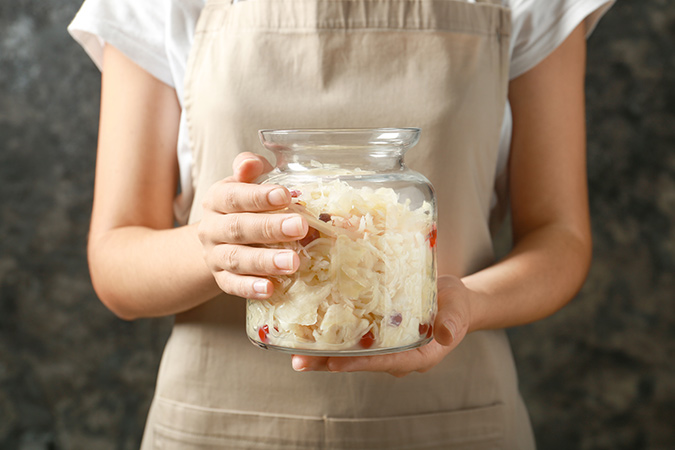
Jar Up a Perfect Batch of DIY Sauerkraut
What I love about fermenting cabbage is that you start with a raw, somewhat bland cabbage head and end up with a crunchy, salty, savory treat. All without cooking or adding a bunch of other ingredients!
Making the perfect batch of homemade fermented sauerkraut is so EASY! So if you are hesitating because you think it’s difficult, let me guide you through the process.
It’s not complicated and takes just a few steps. Plus, all you need is simple, basic kitchenware. There really is nothing to fear!
There’s One Basic Ingredient: Cabbage
")
Image by https://megapixel.click – betexion – photos for free from Pixabay
You’re chopping cabbage, adding salt and an optional spice or vegetable, and letting it sit to ferment. That’s it.
If you’re worried that you might mess up your batch and get food poisoning, don’t fret. Fermented vegetables are safer than raw vegetables, according to the experts.
In fact, wild-fermented vegetables (as opposed to using vinegar) kills bad pathogens you might otherwise find with vegetables in their original state.
This technique has been used since ancient times to preserve food.
You May Also Enjoy:
High-Performance Garden Show, Episode #13: Another Monster Cabbage
What’s So Great About Homemade Sauerkraut?
Homemade fermented sauerkraut is mouthwatering, sour, and crunchy. Use it as a condiment to jazz up a sandwich, or make it a go-to side dish for dinner. Sauerkraut is there waiting in the fridge, happy to satisfy that salt craving when it arises.
You know that feeling … when you go looking for a bag of chips or tortillas. Okay, so it’s not exactly the same as chip munching, but it’s a good substitute.
Fermenting Helps Protect Your Body Against Disease
DIY sauerkraut is a natural probiotic teeming with live, healthy bacteria cultures that promote a healthy gut, improve digestion, allow you to absorb nutrients better, and help you retain vitamins and enzymes.
Regarding vitamins, sauerkraut preserves the vitamin C in cabbage and makes it more bioavailable. The fermentation breaks down proteins into amino acids, creating a kind of predigested food that is easier for the body to use.
")
Image by Alicia Harper from ProbioticReviewGirl.com
Bubble and Fizz Make for Twice the Fun
The fermentation process is what creates sauerkraut’s gut-friendly bacteria—and its saltiness. For that to happen, the cabbage needs to be starved of air. That’s the reason you pack the shredded cabbage tightly and cover it.
As the cabbage ferments, aided by the salt, it becomes acidic. This encourages the lactic acid in the cabbage to allow certain strains of good bacteria (namely lactobacillus) to thrive.
Billions and Billions of Healthy Bacteria
We’re talking lots of beneficial bacteria … billions or even trillions. Bacteria outnumber the cells in our body by 90 percent, so good bacteria is necessary. Meanwhile, other types of bacteria and microorganisms—the disease-causing kind—don’t like the acidic condition and die off.
A Few Words About Starter Cultures
When you become more experienced, you may want to play around with starter cultures and add other vegetables, seeds, and spices. I’ve read about a batch of sauerkraut using a starter culture that was sent to a lab. The report came back with a phenomenal number of friendly bacteria … in the trillions.
You May Also Enjoy:
9 Simple, Effective Probiotics You Can Make at Home
How to Grow Grocery Store Ginger
How to Make Homemade Yogurt: Easy, Inexpensive, and the Healthiest You’ll Ever Eat
The Cabbage Code for DIY Sauerkraut
Your best bet for delicious, homemade fermented sauerkraut is your own fresh-picked harvest or locally sourced cabbage. If either of those isn’t possible, at least buy organic.
If you live in a cool climate, you may be harvesting cabbage from your garden around the start of fall. In warmer climates, like South Texas, you may have to wait until late fall.
Does the Type of Cabbage Matter?
It’s whatever you like. Sometimes, I mix a little red cabbage in with the green. It gives sauerkraut a pretty, bright-pink color.
Cutting Your Cabbage
")
There’s nothing magical about how you cut the cabbage. The easiest way is to cut the head into quarters or eighths and then slice. Shred it to any thickness you desire. Again, it’s a matter of personal preference.
Experiment With Add-Ins
Add other ingredients to your batch of DIY sauerkraut for some interesting tastes.
Here are some options: herbs, seeds, spices, or other vegetables. Some common ones are caraway seeds, dill, garlic, cinnamon, red pepper flakes, carrot, radish, beet, ginger, hot pepper, apple, or green leafy vegetables (spinach, Swiss chard, and kale).
")
Image by Bruno /Germany from Pixabay
Go easy on the added vegetables, though—particularly the dark green ones. The fermentation process brings out strong flavors. You don’t want those strong flavors to overpower your cabbage … or maybe you do, and that’s okay.
Some people like to kick up the heat with peppers. I prefer additions as subtle accents.
My favorite combo is carrots and caraway seeds.
Bring On the Brine
")
Salt performs several functions in making homemade fermented sauerkraut. It helps draw the water out of the cabbage to create the brine, guards against surface mold, and slows down the fermentation process. (In the summer, fermentation takes place more quickly.)
If you want your DIY sauerkraut to be firmer longer, use a bit more salt in summer and less in winter. Also, if you’d like to lessen the saltiness of the sauerkraut, use less salt.
Salt isn’t a requirement for fermentation, so feel free to experiment to reach the salt level that tastes great for you—or don’t use it at all.
I prefer using salt because it quickly draws out the cabbage juices (brine). And I like my sauerkraut on the saltier side. Use kosher salt or sea salt, not table salt. Minimize the use of any salt containing preservatives.
What Do I Need to Get Started?
Don’t let the “fermenting cabbage” supply list that you’ve read about in other places intimidate you. You don’t need a sauerkraut crock with water sealing systems, special airlock lids, or utensils.
When you’re making large batches of DIY sauerkraut, crocks are handy, but there’s nothing special about a crock. Don’t bother buying a tamper either. Use your fist to push down on the cabbage.
We’re going for the simple version here.
Container Options
A glass mason jar is just one type of container you can use to make sauerkraut. If you’re just starting out, it’s the easiest.
Use either a one- or two-quart size. You’ll be able to fit a medium head of shredded cabbage in a one-quart jar. Go for the container that will allow you to tightly pack your cabbage.
A word of caution on containers: Never use plastic or metal containers for this stage. Plastic can leach chemicals, and metal can give the cabbage a metallic taste.
Fill as much of the jar as possible to crowd out any empty spaces that could fill with air. Fermentation likes an anaerobic environment.
")
Time to Cover and “Weight”
Cover the top of the sauerkraut with a piece of discarded outer cabbage leaf—it helps keep the cabbage below the brine and protects it from direct contact with the weighted container you’re about to add.
Now, place pebbles in a small glass jelly jar, and snug the smaller jar into your mason jar on top of the cabbage. Push down once or twice a day, compacting the cabbage and drawing more brine to the top. You want to keep the cabbage submerged under the brine at all times.
You Might Also Enjoy:
The 12 Days Before Christmas in a Mason Jar
15 Types of Salt, and How to Choose the Best Salt for You
How to Choose CBD: Full-Spectrum, Broad-Spectrum, or Isolates
Cover your mason jar with a small kitchen hand towel, and secure with a rubber band. Or use a small inverted plate that will fit inside the mouth of the jar if your jar is packed to the rim.
Contents Under Pressure
Fermenting is going to release pressure the first few days or so. During this time, don’t screw on a lid. The brine will bubble, and you may even hear it fizz.
When I first made sauerkraut, I was thrilled to see bubbles. That’s how I knew I was on the right track.
How Do I Know When It’s Ready?
There’s no set number of days until your sauerkraut is ready. Taste test it every so often. It’s ready when it tastes good to you.
")
As soon as you put it in the refrigerator, the fermentation will slow down significantly.
This is such a great fall and winter food, especially if you like your sauerkraut on the salty side. The longer you let it ferment, the saltier it will become.
What Could Go Wrong?
Very little can go wrong.
Here are some reasons for rancid or moldy sauerkraut:
- Unclean containers or tools
- Air contact with cabbage
- Cabbage not packed below the brine
- Salt contains additives
Rancid?
If the sauerkraut goes rancid, your sense of smell will tip you off. Toss it out if that happens.
Remember—your jar, utensils, and other materials that come in contact with the cabbage need to be washed well in hot, soapy water. Also, your cabbage must be packed tightly and covered.
Moldy?
If a little bit of mold forms on top, you’re okay. Skim it off, and make sure the cabbage stays under the brine. After a few days (or whenever the bubbling stops), make the jar airtight by adding a lid. This will reduce the chance of mold forming.
If mold starts growing down inside with the cabbage, throw it out.
Bad Taste?
Push down on the weighted container to prevent the cabbage from turning bad. It’s also possible that additives in your salt might affect your batch.
When in doubt, take a sample taste.
Finally … Our DIY Sauerkraut Recipe
")
SUPPLIES
- Big pot
- Large, sharp knife
- Cutting board
- 1 or 2 qt. wide-mouth canning jar (mason jar), sterilized
- Small glass jelly jar and lid, sterilized
- Pebbles (for weights)
- Small kitchen cloth
- Rubber band
INGREDIENTS
- One head green cabbage (or part green, part red)
- 1 to 1-1/2 tbsp. kosher or sea salt (or to taste)
INSTRUCTIONS
- Cut cabbage into quarters. Remove the white core, and cut into thin slices. Keep a piece of the outer leaves, and compost the rest.
- If adding other vegetables, peel and slice thinly.
- Place in large bowl or pot. Add salt. “Massage” the shreds for about 7 to 10 minutes. The cabbage will start releasing moisture. It will become limp and more translucent when ready. Save this liquid. It’s your brine.
- Add seeds, herbs, spices, or any other vegetables if desired.
- Pack cabbage and brine tightly into mason jar.
- Snugly place a piece of the saved outer cabbage leaf on top of the shredded cabbage, below the brine.
- Add small pebbles to a jelly jar, or use another container with weights that will fit into the mouth of the jar, pushing down as far as possible to remove any air pockets.
- Cover with a cloth, and secure with a rubber band.
- Set jar in a cool, dark place away from direct sun.
- Each day, or even twice a day, push down on the weighted container to keep any stray cabbage down below the top of the brine. It’s important to keep the air out. Be sure to put the cloth cover back on.
- Your cabbage will bubble, and it might even fizz (or it might not). That’s great! It’s working.
- After about three to five days, give it a taste. If it’s not to your liking, let it sit for another few days before you taste it. (It could take a couple weeks or more, depending on the time of year and the room’s temperature.) If it tastes right, it’s done. Screw the mason jar lid on and refrigerate.
Click here for 5 More DIY Probiotics – Kefir, Kvass, and Kombucha
Dig In!
Enjoy your homemade fermented sauerkraut as an appetizer, snack, side dish, or as a condiment in a sandwich. It will keep in the refrigerator for a year or more.
Smelling, tasting, and looking to see if anything is growing in the cabbage will be your tip-offs to its expiration.
Have fun! Experiment with different flavors. You’re doing your digestive system and overall health a big favor making nature’s super probiotic!
What Do You Think?
Now that you’ve had time to ferment over our recipe, it’s time to share yours! Have you made DIY sauerkraut before? What are your favorite add-ins? Tell us your own yummy story in the comments below.
_______________________
The Grow Network is a participant in the Amazon Services LLC Associates Program, an affiliate program designed to provide a means for our team to earn fees for recommending our favorite products! We may earn a small commission, at no additional cost to you, should you purchase an item after clicking one of our links. Thanks for supporting TGN!
The Grow Network is a global network of people who produce their own food and medicine. We’re the coolest bunch of backyard researchers on Earth! We’re constantly sharing, discovering, and working together to test new paths for sustainable living—while reconnecting with the “old ways” that are slipping away in our modern world. We value soil, water, sunlight, simplicity, sustainability, usefulness, and freedom. We strive to produce, prepare, and preserve our own food and medicine, and we hope you do, too!


COMMENTS(2)
What about food grade 5 gallon buckets? I have made mine that way for years.