I’m done with dogs digging in my compost.
I’m done with not having enough space.
I’m done with messy piles and pallets and half-baked composting systems!
By golly, I’m David the Good and I wrote a whole book on composting—it was way past time for me to step up and build something epic!
Here’s my almost-finished 3-bin composting system, made from concrete and pressure-treated lumber:
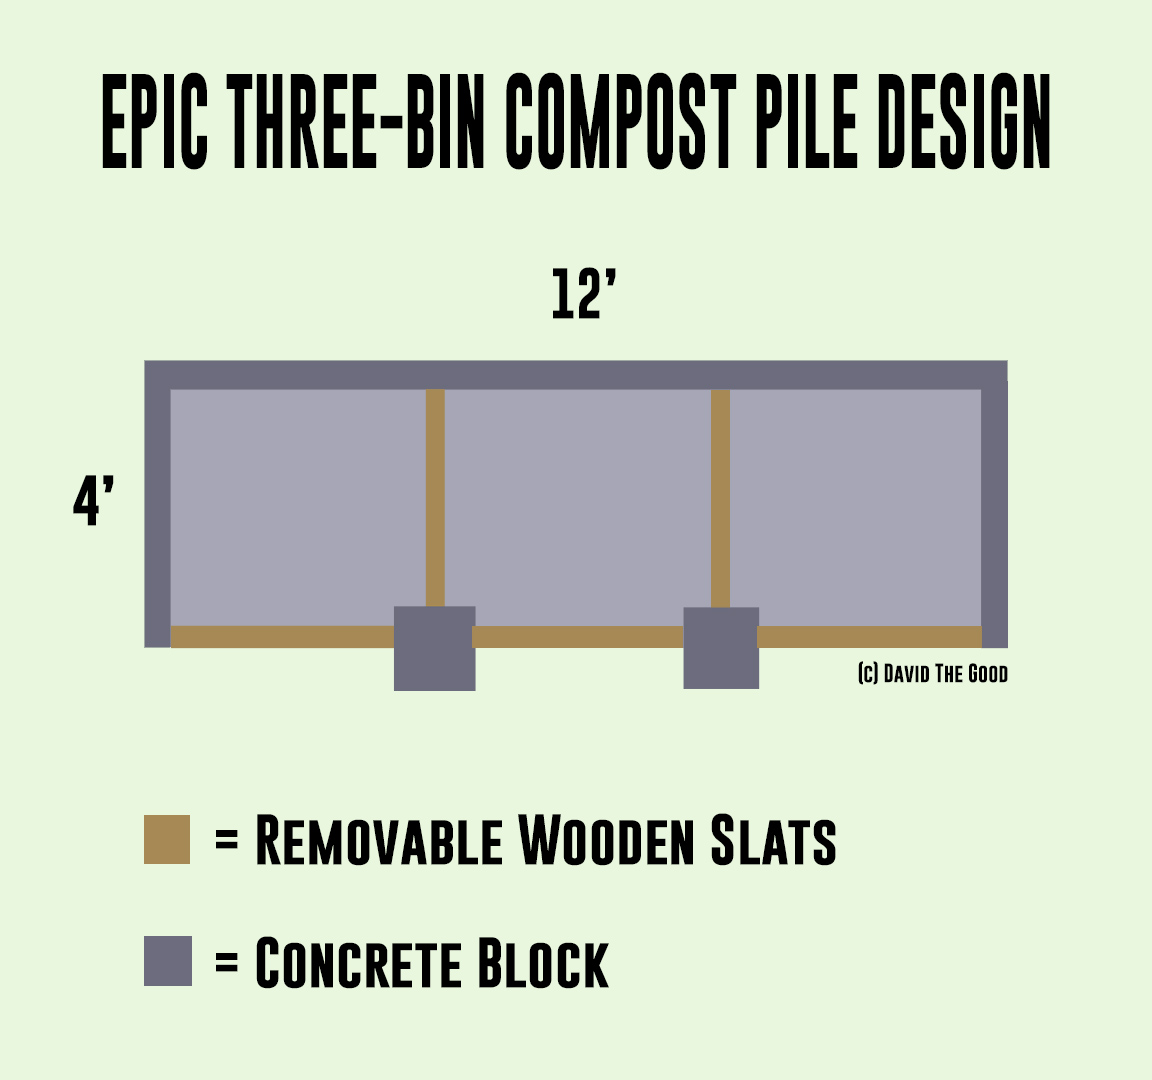
The bin to the left is where all the kitchen scraps and yard “waste” go to break down. I’m not worrying about greens and browns and proper ratios. I’m just going to chuck everything in there.
For most people, getting together all the materials for a “proper” pile with a 24-1 C/N ratio and enough mass to heat up is a heckuva process. It doesn’t relate well to our normal lives where we just want a place to toss banana peels and onion rinds.
With this system, we will just dump in material until it reaches the top, then dump it all over into the next bin and start again with the first bin. The third bin is for the finished compost a few months later.
Here’s the design, all drawn out in glorious 2-D:
The amusing thing about this project is that we built it on the land where I’m also building my house . . . and the compost bin was finished before my home.
Priorities!
Since I filmed the video above, we’ve dumped multiple buckets of kitchen scraps into the first bin and they’re breaking down nicely. We have to do a big homestead cleanup day soon, which will give us plenty of leaves and grass.
So, how did we build this thing?
It was a 3-step process.
Building the Epic 3-Bin Compost Pile
First: Cast a slab that is a little over 4′ x 16′.
Then, once that cures, it’s time to put up block. It’s important to put re-bar into the slab to support your concrete blocks; however, the guy that cast the slab for me did it while I was out of town and did a half-baked job of it, so I had to go back and cast additional small slabs to put the two pillars on the front and make them strong enough to support the wood slats by inserting some rebar. I also found out there was no metal put into the slab itself when it was cast . . . .
Lesson: If you want something done right, you have to do it yourself.
Second: We built up the wall on the back and sides, as well as the pillars. The blocks are 6″ wide but you could go larger. The pillars definitely benefitted from being two deep, rather than a single stack as originally designed, then torn down, then rebuilt by me.
Third: Screw on the strips you will use as guides for your 2″ x 6″ slats. (Make sure to keep the gap wide enough that you can easily slip a 2″ x 6″ between the 2″ x 2″s!)
I used pressure-treated 2″ x 2″ boards for this. First, I marked where I wanted the slats, then drilled into the block with a masonry bit, then plugged those holes with plastic anchors, then screwed my 2″ x 2″s into the holes with solid screws. I have decided I really like Torx screws rather than Phillips. They drive much better and rarely strip if you have the right-sized head. I’ve also discovered that having an impact driver drill specifically made for driving screws is way better than using a multi-purpose drill.
Once the strips are in place, you can start cutting your 2″ x 6″ slats.
Cut and stack until you reach the top and—voilà!—you now have a removable wall that makes it easy to empty bins or shovel them out into the neighboring bin.
You don’t have to have a system like this, of course. Composting can be as easy as throwing things on the ground and letting them rot, as I write in my book. However, this system should work quite well for my large family and last for a long time to come. The only really vulnerable part of this 3-bin compost pile system is that the 2″ x 6″s and 2″ x 2″s will eventually rot, though they are easy enough to replace. And of course, the slab could crack because it’s lacking wire inside, but that’s not my fault.
We should be moving to our land within the next month. I’ll let you know how the compost turns out.
What Do You Think?
What’s your favorite composting system? Let me know in the comments!
__________________
The Grow Network is a participant in the Amazon Services LLC Associates Program, an affiliate program designed to provide a means for our team to earn fees for recommending our favorite products! We may earn a small commission, at no additional cost to you, should you purchase an item after clicking one of our links. Thanks for supporting TGN!
David The Good is a Grow Network Change Maker, a gardening expert, and the author of five books you can find on Amazon: Compost Everything: The Good Guide to Extreme Composting, Grow or Die: The Good Guide to Survival Gardening, Totally Crazy Easy Florida Gardening, Create Your Own Florida Food Forest, and Push the Zone: The Good Guide to Growing Tropical Plants Beyond the Tropics. Find fresh gardening inspiration at his website TheSurvivalGardener.com and be sure to follow his popular YouTube channel.


COMMENTS(1)
Who doesn’t love a good composting bin? No, seriously who? I need to unfriend them on Facebook.